|
|
|
|
 FiOv2 - The second gen iOpener mod FiOv2 - The second gen iOpener mod
|
|
Date Posted: Sep 9 2001
|
|
Author: Joe
|
|
|
|
|
Posting Type: Article
|
|
Category: Hardware Modding
|
|
Page: 2 of 3
|
Article Rank:No Rank Yet
Must Log In to Rank This Article
|
|
|
|
|
Note: This is a legacy article, imported from old code. Due to this some items on the page may not function as expected. Links, Colors, and some images may not be set correctly.
|
|
|
FiOv2 - The second gen iOpener mod By: Joe
|
|
The FiOv2 Unveiled - The Second Gen. Franken Opener
|
|
What Makes this thing Tick?
|
|
|
|
|
|
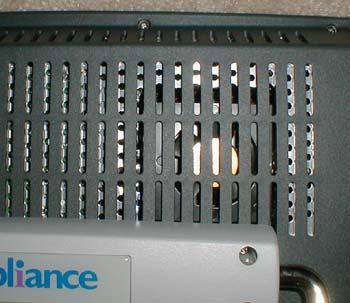
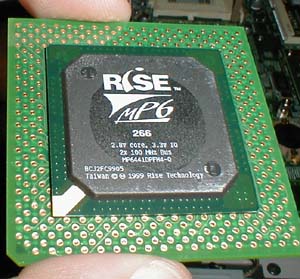
To cool the piping hot RiSE PR266 (200Mhz) cpu, I went with the a specially made Tennmax iOpener CPU Fan. Unfortunately they didn't have the mod to fit the RiSE chip yet when I ordered, It didn't fit cause the RiSE chip is too tall compared to a normal ceramic chip ( this one is a BGA chip on a BGA to PPGA Converter). I broke off both the springs that normally hold the fan and used thermal epoxy on it. The fan isn't going anywhere now :) Its powered off the 5v runs to the Serial Port. It keeps the chip at around 110Deg F.. ( hot yes.. .but its stable)
|
|
|
 |
|
|
|
|
|
|
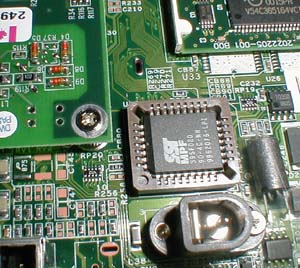
Now for the BIOS How To... This was a V4 iO. so I needed to flash its BIOS to the BIOS of my Franen Opener ( V1). Here is what I did to accomplish this:
|
|
|
|
|
|
Since the V4 iO has a castrated BIOS, I needed to flash it to V1 in order to boot a HD. So here's how I did it:
- Opened up both iOpenerers
- With a "Sharpie" marker I wrote on the tops what iO's they came out of ( v1, and v4)
- With a HD that had the BIOS flash Utils ( awdflash), I booted the V1 iO to DOS.
- Ran Awdflash.exe and wrote a backup of the BIOS image to the HD.
- *DANGER... its gets risky now* - with a 1mm flat blade screw driver WHILE THE MACHINE IS STILL RUNNING, I popped out the V1 BIOS chip out of the PLCC socket.
- With the machine STILL RUNNING, I inserted the V4 chip that I took out of the new iO.
- With Awdflash, I wrote the backup image I just made to the V4 BIOS chip.
And thats it! Worked like a charm. now both the BIOS were V1 vintage.
|
|
|
|
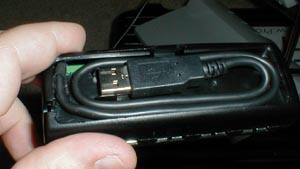
The USB hub from the Original Article had a pleasant suprise, it didn't need to be self powered! you can run it passive ( using power from the iO) as long as you don't exceed 500mA pull off the port. which with the USB2Ethernet NIC, and my Mouse, I still had 200mA left! The hub also hides the cable when not in use, ( can coil up inside). Nicely engineered device. Its made by Targus.
|
|
|
|
|
|
After that it was basically the exact same HD method as the Franken iOpener. Mounted it to the RF shield and it worked great.
|
|
|
|
|
|
Now the Fun Begins :)
|
|
|
|
 |
|
|
|
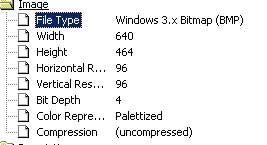
That is the BIOS screen :) Via a lil tool called CBROM130.exe you are able to write Images to the Award ROM. You can dload a copy of CBrom.zip here the specs are -
|
|
|
|
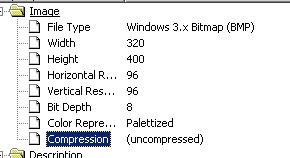
Here is the "Summary" of the file I used for that picture. It needs to be 16 color ( 4bit), and 640x464.
Run CBROM with the /? switch to get instructions on how to use it. its simple enough.
Do NOT do this if you are unsure about it, but I did it 3 times and to every machine I have that runs Award BIOS, and it worked every time.
|
|
|
|
|
|
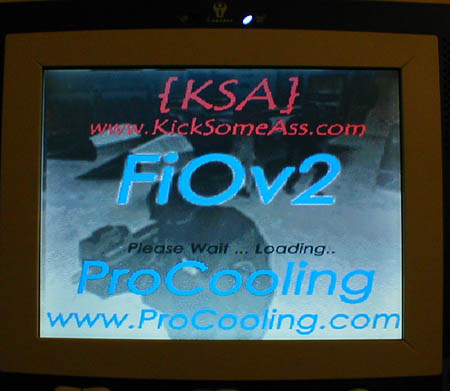
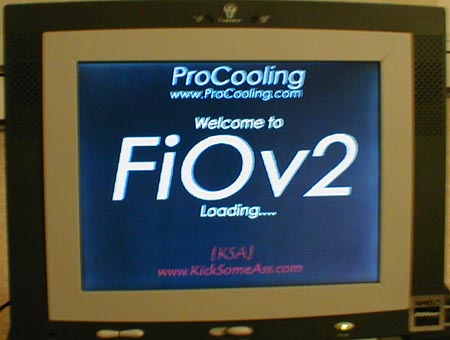
Here is the Win98SE boot screen, I had some fun with it. Trust me, lil things like the BIOS screen and the WinBoot screen really make people go "Wow.. thats slick" For those that don't know, make an image that matches the specs to the right, and rename it to logo.sys and place it in your root of the boot drive.
|
|
|
|
|
|
| Random Forum Pic |
 |
From Thread:
psu issue |
|
I agree!
|
 67% 67%
|
|
What?
|
 17% 17%
|
|
Hell NO!
|
 0% 0%
|
|
Worst Poll Ever.
|
 17% 17%
|
Total Votes:18
Please Login to Vote!
|
|