|
|
|
|
 Airspirits Watercooled Rackmount Part 1 Airspirits Watercooled Rackmount Part 1
|
|
Date Posted: Dec 6 2002
|
|
Author: Airspirit
|
|
|
|
|
Posting Type: Article
|
|
Category: ProCooling Projects
|
|
Page: 1 of 3
|
|
Article Rank:No Rank Yet
Must Log In to Rank This Article
|
|
|
|
|
Note: This is a legacy article, imported from old code. Due to this some items on the page may not function as expected. Links, Colors, and some images may not be set correctly.
|
|
|
Airspirits Watercooled Rackmount Part 1 By: Airspirit
|
|
|
|
|
The airspirit Watercooled Rackmount Project
Pro/Geeks! By: Airspirit 12/06/02
|
|
|
|
|
This article was submitted via the Pro/Geeks! service ProCooling runs for its readers and cooling geeks like you. Monthly we offer prizes for those readers or just overall geeks that can write the best articles/reviews and want them posted on ProCooling. For more info on how you can get some free stuff, please check this link!
|
|
|
|
It all started as a way to clean my network room up. In that room I currently have three computers (one is out of commission for a while), a mess of routers, hubs, switches, and wireless APs and antennas. The space in between all these parts is filled with ethernet cable strewn everywhere. I'm currently hosting a network for my entire neighborhood, including remote file hosting, FTP, intranet, and other assorted goodies that we won't discuss here (my ISPs might get upset ... ).
|
|
|
|
|
I thought to myself that it would be nice to have a server cabinet to stack all of my machines in, freeing valuable floor space, and by hooking the majority of my networking gear up on a shelf on the top it would free myself from the spaghetti mess of the CAT5. The only problem was that one of my machines was watercooled in an especially bizarre way (including a "football" [reservoir/air trap] trailing behind it), making it difficult to fit the system into a 4U rackmount case.
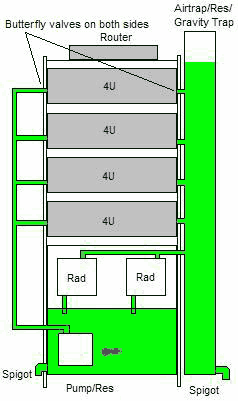
After rolling this idea around in my head for a while, I came across a thread on Pro/Forums that asked what we would change if we could redesign our WC system from scratch. Immediately I pictured a centralized cooling system for a rackmount unit with a giant vertical reservoir running up one side, also serving as a gravity based return feeding the radiators, and eventually the pump. I pictured the pump pumping up through multiple parallel channels, one feeding each computer system, with the 4U cases uncluttered, only containing a hose coming in one side, a water block on the CPU, and a hose going out to the drain on the other side. My initial idea was like this:
Using very little floor space, I could keep all of my hardware together, and watercool all of my machines from one well-built loop.
|
|
|
Very quickly I discovered that rack mount equipment was very expensive, and since I was looking to put money into quality components rather than good looks, I decided to change the idea a little. I decided that it would be just as effective to use stacked desktop cases as it would 4U cases, and I could do it for a fraction the cost. I also decided that it would be better to use one huge radiator than multiple smaller ones, just for ease of assembly. I also decided that it would be better to use an inline pump and only one reservoir, necessitating only one drain valve. By constructing PVC manifolds similar to what feed and exhaust the cylinders in a car, I could easily unplug extra channels to quickly add extra computers in. Overall, the required components are as follows, with X meaning one for each added PC:
|
|
|
Item
|
Use
|
|
15 ft 1/2" tubing
|
To string from the manifolds to the computer internals
|
|
10 ft 3/8" tubing
|
to attach to the water blocks and run outside to the manifold lines
|
|
1 large radiator
|
To cool the heated water
|
|
1 powerful pump
|
To keep a highly restrictive loop flowing
|
|
A homemade box
|
To contain all of the major cooling components
|
|
PVC
|
Lots of it ... you'll see!
|
|
X desktop cases
|
To stack the PCs in on the cooling box
|
|
1 large fan
|
To turn the cooling box into a big wind tunnel, allowing the radiator to breath
|
|
Gallons of water
|
To fill the cooling loop with
|
|
Hyperlube
|
To keep the coolant from "rotting"
|
|
X water blocks
|
To cool the CPUs
|
|
|
Needless to say, this is going to be a very expensive project. I suspect that the it will run over $1000 to finish this project once I get started (since one machine needs upgraded before I put it on the loop), so I will be doing this in phases stretched over a few months. First I will acquire the hardware and start assembling the system. Once my proof of concept run (before the PVC is assembled) is done, I will finish building the infrastructure (using my old 350 GPH pump, if it can take the work), and begin Phase 1, which is putting the first PC on the cooling loop. Phase 2 will involve upgrading to a stronger pump and putting a second PC on the loop. Phase 3 will probably be anticlimactic, since it will just involve adding a third PC to the loop (which will be old hat by this point), but will also require better tuning of the cooling system to get maximum results (less hardware tinkering, more theory for the engineer types). I think I'll have a few surprises for everyone with what will happen here. Once all three PCs are on the loop, I'll have a page for conclusions and regrets and any other idiocy that I decide to share (like incidental damage to my house and such, which there is quite a bit of).
Now that I know what I need to buy, though, lets get to the hardware, shall we?
|
|
|
|
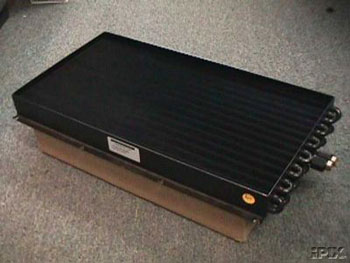
First thing I needed was a good heater core or radiator. BigBen2K couldn't think of anything (which effectively means that one doesn't exist ... that guy knows way to much about automotive heater cores ... just thought I'd clarify that), so I turned to EBay, and found this little jewel:
|
|
|
|
Little isn't quite the right word for it though. It is a Lytron 6320 with threads for 1/2" fittings on the end, 1/2" tube throughout, and measures 23"x12"x3.5" in size. Hell, the thing weighs 17.5 lbs of pure copper!!!
The Surplus Store from EBay sells these all the time, if anyone wants to try this at home. Be sure you consider what I'm using this for before wanting to hook it up to your single PC ... you'll never fit this into a standard PC case (not even the full towers) necessitating an external mount.
|
|
|
|
|
|
|
|
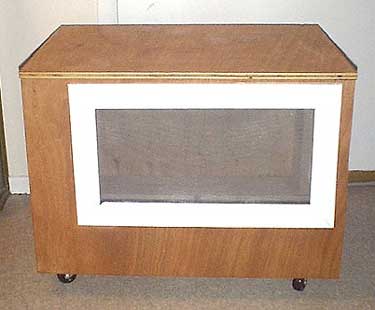
I made a chest style box with a window in the front to mount the radiator. In the back I'm going to make cutouts for fans and other peripherals (a light, maybe, to shine through the radiator?). In each side I'd have 1-2 2" holes for coolant access. On top of the box I'm going to stack the old school desktop cases with rubber feet on the bottom of them to keep them from tumbling down like toy blocks if I bump the base. This is a very stable box, capable of supporting the combined weight of my wife and I standing on top of it. I don't think we'll have a structural problem. Not too shabby for someone who hasn't done any woodworking in years.
|
|
|
See? Bare bones and utilitarian. Wouldn't it look good with the face plate covered in chrome paint? We may get there later. The pictures and cases were acquired through Newegg (another excellent distributor, and the pictures they provide have helped me with numerous buying decisions, such as this one).
Initially, I was planning on using a 5 ft length of clear 3" PVC for a res/gravity airtrap. Unfortunately, that would set me back over a hundred dollars, so I decided to go with opaque PVC (since price isn't a problem with this, I upped the size to 4"). The design of the system was simple. Near the top I'd put in a "Y", and in the offset section (down-tilted to ensure that the bubbles would rise out of the coolant), I would attach one of two manifolds for the PCs to exhaust into. To fill this beast, I'd just have to close the valve, unscrew the lid, fill the res to within 6" of the top with coolant, and plug in the pump. With an airtrap so long and efficient, it would be a manner of minutes before the system would be completely bled of air ... the trick is going to be arranging the cooling box so that there is nowhere for air to be trapped.
The second manifold would be placed on the opposite side of the cooling box, so that the coolant would enter one side of the Enlight 7200 cases, and exhaust out of the other side.
|
|
|
|
|
|
|
|
Further along the acquisition trail, I found on Pro/Deals (exclusive deals for Procooling members by various merchants) an advertisement for Clearflex 60 for 50% off at CoolTechnica. I did a little dance, picked up 10 feet of the 3/8" (for use inside the cases ... adds restriction to the parallel loops preventing massive fluid slowdown), and 15 feet of the 1/2" (for the lines inside of the cooling box and connecting the cooling box to the cases). For those of you that don't know, Clearflex 60 is the same formula as Tygon R-3603, giving you all the benefits of the premier WC tubing at a third the cost. Most of you are paying $0.75 a foot for vinyl at Home Depot or Ace Hardware ... you really should look at the good stuff. Picture from US Plastics.
|
|
|
Image courtesy of US Plastics
|
|
|
|
As far as water blocks for the CPUs go, I need two things: good cooling, and low price (though I'm trying to de-ghetto my house, I'm not rich ... I have a wife to put through college and three voracious weasels to feed!). I decided on the Black Edge from Becooling. I already have one, and it has performed relatively well (I suspect the 3/8" interior size and lack of proper lapping is what prevented it from being excellent), but since a 3/8" waterblock is what I'm after, I can't go wrong with this proven performer. One thing to note about this block is that the lapping from the manufacturer is very lacking ... you really need to re-lap this baby to get good results. If you're looking for bang for your buck in 3/8", you would be hard pressed to do better.
|
|
|
|
Image courtesy of Becooling.
|
|
|
|
| Random Forum Pic |
 |
| From Thread: Online Vendors? |
|
| | ProCooling Poll: |
| So why the hell not? |
|
I agree!
|
 67% 67%
|
|
What?
|
 17% 17%
|
|
Hell NO!
|
 0% 0%
|
|
Worst Poll Ever.
|
 17% 17%
|
Total Votes:18Please Login to Vote!
|
|