|
|
|
|
 Airspirits Watercooled Rackmount Part 2 Airspirits Watercooled Rackmount Part 2
|
|
Date Posted: Dec 18 2002
|
|
Author: Airspirit
|
|
|
|
|
Posting Type: Article
|
|
Category: ProCooling Projects
|
|
Page: 1 of 1
|
|
Article Rank:No Rank Yet
Must Log In to Rank This Article
|
|
|
|
|
Note: This is a legacy article, imported from old code. Due to this some items on the page may not function as expected. Links, Colors, and some images may not be set correctly.
|
|
|
Airspirits Watercooled Rackmount Part 2 By: Airspirit
|
|
|
|
|
The airspirit Watercooled Rackmount Project Phase 2
Pro/Geeks! By: Airspirit 12/21/02
|
|
|
Computer Specs:
Athlon 700 @770 Mhz/1.6V, EPoX 7KXA - KX133, 640 MB Generic PC100 SDR @Std. V
|
|
|
|
|
|
|
|
|
|
|
|
|
|
|
|
|
 |
|
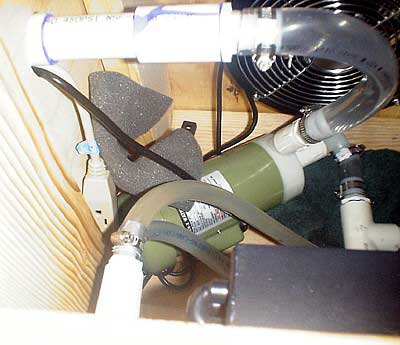
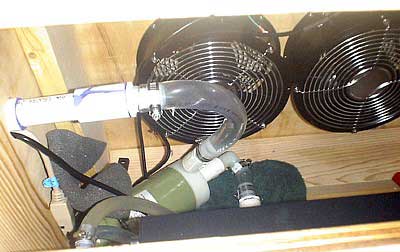
This is where the hardcore water cooler can start getting interested, as this is where we start cooling multiple machines. For the fan jockeys among us, here are some gratuitous pictures of my 10" Caravels installed. Imagine sticking one of those on a side window ....
First, I replaced the 350 GPH pump with the new Gen-X Mak4 pump, and installed the Comair Rotron Caravel AC fans on a custom dimmer circuit. The design of the dimmer was simple. After trying a Lutron fully variable fan controller (600W) and getting horrendous buzzing from my fans, I switched to an Ace Hardware brand "Dehummer" 3-Way Triac fan controller. The hum was eliminated, though I am now limited to three speed settings: Full speed (47 dB, 1100 CFM), low speed (≈34 dB, ≈200 CFM), and stall speed (clicking from the fans from stalling, ≈10 CFM). I put the fan controller inline on a 3 way power strip, so both of my fans are controlled off of one switch. This also means that both of them are feeding off of one plug in the wall. When only one fan is plugged into the strip, the settings are Full/75%/40%, but since I only have one switch, This will have to do for now. I will probably put in full three speed functionality for both fans on separate power lines during Phase 3, but I'm too cheap to spend another $30 on a switch at this moment.
|
|
|
|
|
|
 |
|
|
|
|
Installation of the second computer was identical to installing the computer in phase one save for one hitch that I will get to later. All I had to do was drain the system (one valve, quite nice), pull one plug from each manifold, and extend hoses from the newly installed barbs to a second Black Edge water block. Once the block was installed, I closed the drain valve, opened the bypass to full, and turned the pump on after dumping 4.5 gallons of water/alcohol into it. The system primed itself perfectly, and there were no leaks anywhere in the system.
Sweet.
|
|
|
 |
|
|
|
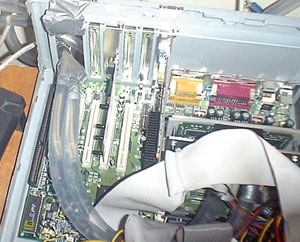
The only hitch that I encountered was getting the cartridge off of the Slot A Athlon. After prying at it with a couple of screwdrivers, I finally fired up my Dremel and it came right off. I would caution anyone trying the same thing to be very careful, since at times I had less than 2 mm between my cutting wheel and the processor card. This took about an hour of cursing and a bottle of Pennsylvania Dutch hard eggnog (good stuff, though it dries your mouth out something fierce ... 750 ml of Eggnog, brandy, rum, and blended whisky goodness) in order to finish. When the block was installed, the processor was aligned to the block as shown, due to the size of the Becooling Slot A clamp I was using (which, I must admit, is a quality part).
Let it be known that I don't recommend doing surgery to hardware while under the influence. Do so at your own peril. It was probably a good thing that I didn't have a second bottle handy ... anyway, back to the article.
|
|
|
|
|
|
 |
|
|
|
|
|
 |
|
|
 |
|
|
|
|
|
Once the block was installed and my second computer was happily in its new case, I stuck the processor in and fired her up. Once I confirmed that even with the odd CPU alignment on the block it would be adequately cooled, I closed up the case and reinstalled my original computer.
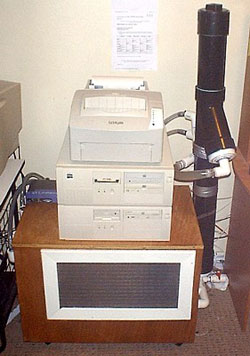
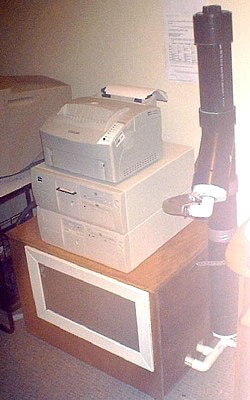
With both PCs on the loop and the system pumping at 5/8" ID throughout on a pump optimized for 3/4", the pump makes about 36 dB of noise, mostly a low bass vibration, similar to what you would hear from a large aquarium setup at your local pet store. When the fans are turned down to low, this is the only thing that you can hear from the entire setup at all. Peak noise of 36 dB for two PCs is acceptable, in my eyes, but I'm going to see if there is any way to quiet that pump down ... but that is work for another day.
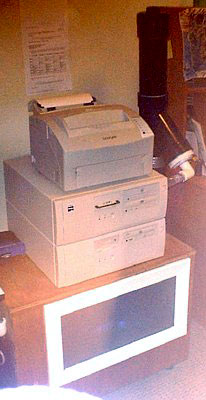
Imagine how sweet this will look with three PCs stacked like that ... at that point, the printer will probably find its home on a filing cabinet we've been using for that purpose, with the router/firewall for those three PCs sitting on top in its place of honor. I like being able to watch the access lights ... which is why I will probably mod the lights on my current LAN cards/adapters in the place of the power LED on the cases. Again, that is a job for another day.
|
|
|
 |
|
|
|
|
|
|
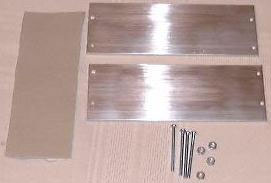
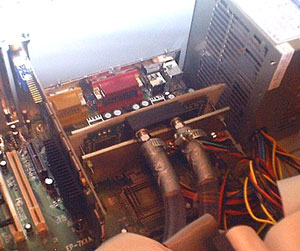
You can see in this picture how I have the hoses entering and exiting the case. To secure them, all the IDE and power cables are braided around them to hold them in place, in case they get jerked on from outside. I do NOT need my Slot A processor being broken out of its slot. The only difference in this setup from the last is that in the last setup, I cut away 3xPCI slots. I decided to leave this case less modified than the last since I may need to upgrade this machine in the future, and I don't know whether or not I will need those PCI slots available. Even though I'm leaving the screw hole and 1/4" of the support bar intact (which is why I made the padding for the top and bottom of the entrance hole ... they are made of modified maxi pads, if anyone wanted to know just how ghetto
|
|
|
|
my logic is), I would not want to have to rely on that solely for support of one of my cards if I don't have to.
One benefit of this setup is that I can remove the block and tackle out of the case without having to remove any hoses, ensuring that there will never be any leakage from my components. I just have to turn the block sideways and pivot it out through the hole.
|
|
|
|
|
|
|
|
|
 |
|
|
|
Overall, the look of the entire unit is good, and I'm extremely happy with the result. I succeeded in achieving my rack mount look with the cases I am using, and even my wife is happy with the outcome so far (this is the highest form of praise, since she doesn't approve of my hobby). Once I confirmed that neither machine would light on fire, I closed the bypass completely (first I brought the coolant to what I figured was its maximum temperature by running Prime95 for two hours on both PCs with the bypass on, diverting the maximum amount of water from the radiator and allowing it to get well above room temperature. Once that was completed, I diverted all coolant through the radiator, achieving only a total of about 3 GPH through the entire system, measured by estimating speed by watching the "bubble tube".
|
|
|
 |
|
|
Initial temps were encouraging. At idle, the Slot A PC stayed at 35C idle/39C load, and the Socket A PC stayed at 41C idle/47C load. I slowly opened the bypass a little at a time. Eventually I found a maximum balance point of about 6 GPH for 34C/37C on the Slot A PC, and 37C/44C on the Socket A PC with the 1" bypass open about 30%. The minimum inner diameter of the system is at no point lower than a net width of 5/8" ID. During all of these tests the fans were set to full.
|
|
|
|
I would like to point out that this proves my bypass theory on high flow cooling applications. This was a hotly contested issue in the Pro/Forums, and this seems to indicate that, at least in my system, watercooling loops can be optimized by allowing more flow through the
|
|
|
|
|
block by allowing a portion of the flow to bypass a highly restrictive radiator or heater core. By allowing more flow through the system by partially bypassing the resistance of the radiator, I allowed more flow to the blocks allowing them to cool the processor more efficiently. This also keeps the ∆T of the coolant to the air higher, allowing the radiator to work more efficiently with the coolant that actually passes through it. Inevitably, this means that the entire coolant mass remains at a higher temperature, but this difference is well less than 2C, preventing the higher coolant temperature from making up for the increased efficiency of the water blocks. I suspect that bypassing the radiator will be more of a factor when a third PC is added in Phase 3 requiring even more flow for the system to cool the coolant effectively.
The entire sound volume of the system hovers at around 48 dB when the fans are on full (this is low pitched sound, so it isn't as obnoxious as the equivalent volume in smaller high-pitched screamer fans common to high-end air cooling), and well under 40 dB when the fans are on low settings (the pump, at about 36 dB, is the loudest part in the entire system), which is how I leave them when the PCs are idling or I'm just surfing the web (it saves power and the temps only go up by 1C, so I don't see how it can hurt anything to silence my computer room). Overall, I think Phase 2 is a success, proving that sacrifices need not be made when cooling multiple PCs on a single loop.
|
|
|
|
| Random Forum Pic |
 |
| From Thread: Design review |
|
| | ProCooling Poll: |
| So why the hell not? |
|
I agree!
|
 67% 67%
|
|
What?
|
 17% 17%
|
|
Hell NO!
|
 0% 0%
|
|
Worst Poll Ever.
|
 17% 17%
|
Total Votes:18Please Login to Vote!
|
|