|
|
|
|
 CrystalFontz 633 Review CrystalFontz 633 Review
|
|
Date Posted: Feb 20 2003
|
|
Author: pHaestus
|
|
|
|
|
Posting Type: Review
|
|
Category: Thermal Management Reviews
|
|
Page: 1 of 3
|
|
Article Rank:No Rank Yet
Must Log In to Rank This Article
|
|
|
|
|
Note: This is a legacy article, imported from old code. Due to this some items on the page may not function as expected. Links, Colors, and some images may not be set correctly.
|
|
|
CrystalFontz 633 Review By: pHaestus
|
|
 |
|
|
By: pHaestus 3/8/02 and Updated 2/20/03
|
|
|
|
pH has updated his Original CF633 Review with a
3rd page looking at some nice developments in the last year! Check it out here.
|
|
My computer testing area usually looks a little like a picture from a mad scientist's lab.
There are two computers with no cases, and watercooling gear is suspended from shelving and walls. But the one thing that strikes everyone who sees it for the first time is the massive amounts of temperature monitoring equipment that I have set up. I have two dual compunurses, a Digidoc5, and
several diode readers made from maxim-ic.com chips that are connected from the SMBus. I like to take temperatures in as many locations as possible, and with the best reproducibility and resolution that I can afford.
One of the most important items in a cooling freak's setup (ranking right up there with Plumber's Goop in usefulness) is a good piece of temperature monitoring
equipment.
Without an accurate way to measure temperatures, it is impossible to fully optimize and troubleshoot your cooling system, and with extreme cooling it is often necessary to incorporate some failsafe mechanism tied into your monitoring equipment to save your rig in the event of a failure. And let's be honest, temperature readouts on the front of your cases look cool and impress the ladies.
As someone who has been playing around with cooling gear for a long time, I have tried out a variety of temperature monitoring tools. For a long time, I
used a dual Compunurse digital thermometer setup to monitor case and CPU temperatures.
This worked reasonably well, but the Compunurses seem to drift in temperature over time(or maybe I just tend to damage them somehow), and their LCD displays weren't backlit. I then switched to using a DigiDoc5 from Macpower. The Digidoc is a highly cool piece of equipment for cooling geeks as it monitors the 12V and 5V voltages directly from a Molex connector and also has 8 thermistors and 8 3pin fan headers. You can set it up to turn fans on and off based upon a preset temperature. The DigiDoc5 has a nice orange backlit display, so in the cool looks department it was a definite improvement over the Compunurse. Even though thermistors can sometimes be a bit inaccurate and the on/off fan control was a bit useless, the DigiDoc was a really revolutionary product that brought temperature monitoring to many PC users due to its cool looks and versatility. And for a very long time it has been alone in the marketplace.
However, when I saw the specifications of the CrystalFontz 633, I realized that Crystalfontz
was also impressed with the idea of a combination temperature reader and fan controller. Crystalfontz is a company that is well-known for manufacturing serial LCD displays that many case modders add to their systems. You can use software to display Motherboard Monitor info, HDD space, network information, winamp stats and VU meters, and a huge variety of other things (mostly for looks). However, with the CF 633, they have designed an extremely powerful and versatile product targeted at server admins but that seems to be the perfect tool for anyone interested in cooling. I just HAD to pick one up and test it out.
|
|
At first glance, the CF 633 seems like a fairly typical product from Crystalfontz.
It has a 2x16 lcd that is green and backlit and it connects to a computer via a serial interface (RS232).
|
|
|
|
The CF 644 has a keypad with 6 buttons on it, and the keypad is also illuminated by LEDs when the backlight is turned on for the unit.
When you turn the CF 633 over though you quickly realize that there is much more to this product than expected.
|
|
|
|
 |
|
The CF 633 is no ordinary LCD; it sports 4 fan headers with Pulse Width Modulation (PWM) for variable speed (and noise) control of fans. In a nutshell,
PWM is a method of adjusting fan speed by applying voltage to the fan in pulses rather than continuously. This is far more efficient than linear voltage regulation for fans because there is no excess heat produced by
lowering the fan's speed.
If you need details on how PWM works, please take a look at BrianS's excellent article on fan control.
The CF 633's PWM control is all controlled via software, and the fan headers also handle RPM monitoring if the fans are running at 100%.
Besides the software-controlled fan adjustment, the CF 633 also features temperature monitoring via a rather unique interface: Dallas 1-Wire (DOW) technology.
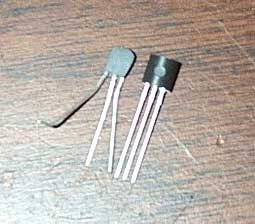
Dallas 1-Wire is a serial technology developed by Dallas Semiconductor for interfacing multiple temperature probes (among many other things) to a controller via a single wire. In the case of the temperature probes, the CF 633 can utilize either the DS1822 or DS18B20 sensors. The DS1822 is accurate to +/- 2.0C, while the DS18B20 has +/-0.5C accuracy. The advantages to the DS1822 are their lower price and the fact that they are available in smaller form factors. Both sensors share a common architecture; rather than being a thermocouple or thermistor, they are actually a self-contained digital i/o thermometer in a transistor packaging. The sensors have three connections for voltage (3.3 to 5.0V), ground, and serial. The serial wire is how the sensor sends temperature readings back to the CF 633. The sensors also have an embedded 64bit serial number. This number allows the sensors to all be distinguished when there are multiple sensors all connected. Up to 32 thermal sensors can be daisy-chained and connected to the CF 633. There are many other DOW products that compatible with the CF 633: Analog to Digital Converters, voltage monitoring, current monitoring, iButton, digital potentiometers, and more.
|
|
|
|
One thing that I was definitely interested in was how much of the sensor packaging could safely be filed away.
In their stock form, they are a barrel shaped black package (like a transistor) that is pretty bulky. I filed one down with a miniature file until I encountered metal to get an idea of how much I could trim off the sensor.
With about 10 minutes of filing I could get the sensor to something much more manageable. The finished sensor is about the same size as the
head of a match and would be a lot easier to place. The response to changes in temperature also seemed to be a bit faster.
|
|
|
|
Accessories/Options
Crystalfontz offers several accessories and options with the 633. It can be purchased as a bare unit or with the optional faceplate that is reviewed.
A serial connector is also needed and is available from CF directly. At this time, Crystalfontz is not selling the DOW temperature sensors, and so you may want to either wait for them to stock prebuilt chains of sensors or else find a source for the sensors online.
|
|
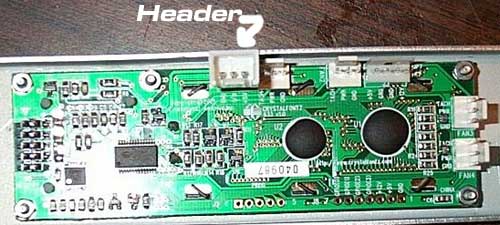
Crystalfontz chose to leave a few of the details of assembly to the end user. There was no header on the back of the PCB for Dallas 1-Wire
connectivity. I was strongly urged by the Crystalfontz representative not to solder on a fan header, because if the DOW temp sensors are plugged into one of the 633's fan headers by mistake then the 12V from the fan
header would fry every sensor on the chain. I happened to have some fan headers that look different from the ones on the 633 though so I went ahead anyway :).
|
|
|
|
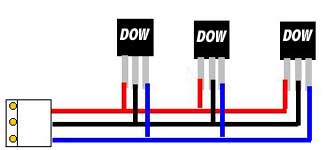
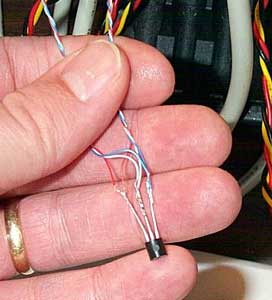
Once the header was added, the next step was to solder together a string of the temperature sensors.
This is fairly straightforward; just daisy-chain them together with 2 wires meeting at the DOW temperature probe's legs. Below is a picture of one of the sensors soldered together.
|
|
|
|
|
 |
|
|
After you have added several sensors, then connect one end to a connector to mate the chain of sensors to the 633.
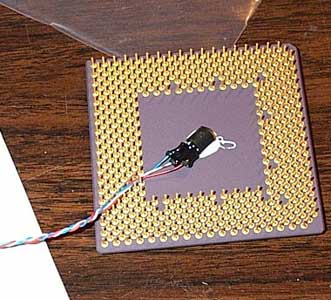
There is one sensor that will be at the end of the string, and I chose to epoxy it under the core of my Morgan Duron 1000. I used a bit of Arctic Alumina epoxy to permanently put the sensor in place. The DOW sensor is rather bulky and I couldn't come up with a method to securely mount it while using thermal paste.
Now that the temperature sensors were all in place, I scavenged some parts from a DigiDoc5 to complete the installation: a floppy to Molex
adapter and four 3pin fan wire extensions. The only other step was to connect the LCD to the serial port using a cable that I purchased from Crystalfontz along with the LCD.
|
|
|
|
|
| Random Forum Pic |
 |
| From Thread: CyberDruid Aquatronic |
|
| | ProCooling Poll: |
| So why the hell not? |
|
I agree!
|
 67% 67%
|
|
What?
|
 17% 17%
|
|
Hell NO!
|
 0% 0%
|
|
Worst Poll Ever.
|
 17% 17%
|
Total Votes:18Please Login to Vote!
|
|


 CrystalFontz 633 Review


