|
|
|
|
 Matrix Orbital MX212 Vs Crystal Fonts 633 Shootout Matrix Orbital MX212 Vs Crystal Fonts 633 Shootout
|
|
Date Posted: Oct 3 2003
|
|
Author: pHaestus
|
|
|
|
|
Posting Type: Review
|
|
Category: Thermal Management Reviews
|
|
Page: 1 of 3
|
|
Article Rank:No Rank Yet
Must Log In to Rank This Article
|
|
|
|
|
Note: This is a legacy article, imported from old code. Due to this some items on the page may not function as expected. Links, Colors, and some images may not be set correctly.
|
|
|
Matrix Orbital MX212 Vs Crystal Fonts 633 Shootout By: pHaestus
|
|
|
|
|
Introduction
|
|
LCDs are one PC item that you can certainly live without, but that really draw attention to your system when you have them. My wife is always
impressed when I put an LCD into a project system; something about the scrolling letters that is just impressive I guess.
Today, LCDs are on the market that do a lot more than just look pretty though. They have temperature probes, fan control, and a wide variety of other monitoring and control features. These new LCDs are basically control centers for your PC's cooling. Matrix Orbital refers to their new unit, the MX 212, as a "digital baybus". That seems like a pretty good term for this new generation of LCDs.
I believe Crystalfontz was the first to sell what MO calls a digital baybus, and I have been using their serial unit for over a year now.
When I saw the new Matrix Orbital MX2
|
|
|
|
|
series with temperature and fan control, and saw that Crystalfontz sells an updated CF 633, I decided that a head to head comparison would be pretty
interesting.
After speaking with Crystalfontz and Matrix Orbital, I soon had brand new units in my possession. I tried to put them through their paces and try all their features so that I could give you guys a truly informed opinion. One thing that you'll all agree upon is that the look great.
I found it very amusing that representatives from Matrix Orbital and Crystalfontz were both extremely confident that they have the best product on the market.
These guys both really believe in their products, and were prompt to respond to any questions and issues that I had. After dealing with both these companies, I can recommend purchasing from either one with 100% confidence.
But enough with the formalities, let me tell you all about the Matrix Orbital MX212 and the Crystalfontz CF633-USB.
|
|
Matrix Orbital
is a company that is known to most case modders for the large number of colors and backlighting options available on their LCDs. It was recently pointed out to me that their MX2 series of LCDs has many features in common with the Crystalfontz 633 I reviewed a year ago. I saw "temperature monitoring" and "fan control" and decided to ask for a unit for review. Henry at Matrix Orbital quickly responded with some more details
about their products, a list of accessories, and shipped me out their most popular lcd for review, the MX 212. He assured me that I was about to see "a real digital baybus".
Two days later, a package arrived from Matrix Orbital containing:
- MX 212 USB LCD
- Internal and external USB cables
- 3 DOW temperature probes
- a 3 pin to 4 pin molex adapter (with rpm wires)
- a LED indicator bus
- Instructions for installation
- A mini CD with LCDC serial number, USB drivers, and a user's manual
Features
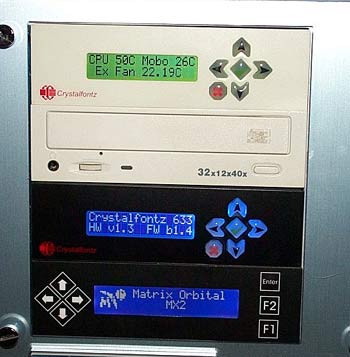
The most noticeable feature of the MX 212 is, of course, the LCD and 5.25" bay bracket. The LCD on the 212 is blue with white lettering, and the bracket
is black with 7 keys on it (up, down, left, right, F1, F2, and enter). It's a very nice looking setup, and the LCD is a good bit larger than the one on my CF633. The blue and white LCD looks really sharp when lit up
too. Advantage Matrix Orbital.
|
|
 |
|
But I am not so superficial as to be completely blown away by a big lcd and eyecandy on the screen. Eventually I decided to flip the MX 212 over and see
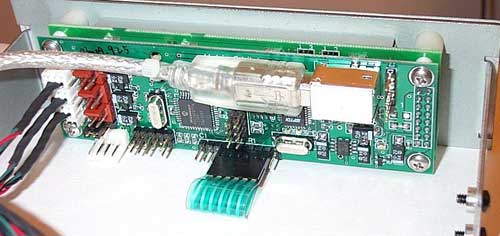
what it could actually DO. Here is a picture of the PCB:
|
|
 |
|
|
|
The silver cable on the top is a USB cable that has a normal external USB connector on the other end. I played around with the MO unit for a couple of
hours using my notebook to connect to the MX 212.
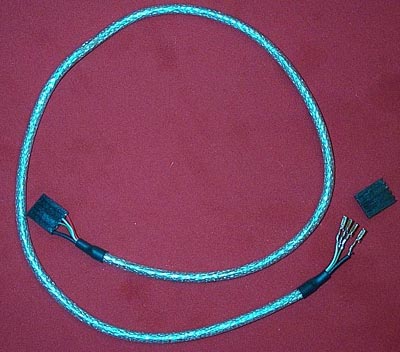
All of the DOW temperature probes and the LCD worked fine this way (they receive 5V from the USB). To the right of the external USB connector there is a header for connecting the MX 212 to an internal USB header from a motherboard. Matrix Orbital included the internal cable as well, and it was noteworthy for two reasons. First of all, it was covered in the same "silver mesh coated with plastic" of the external cable, and this is exactly the same material as my round IDE cables and my round SCSI cable. Second, and more importantly, Matrix Orbital leaves the header on one side of the internal cable unassembled so that you can wire it to fit properly onto any motherboard header. This is not too difficult to do as Matrix Orbital includes clear instructions on how to put it together and install it.
|
|
 |
|
Next up, on the far left, there are three DOW temperature sensors plugged into their headers. It's difficult to see in the picture, but there is a fourth
unfilled header at the bottom.
Matrix Orbital decided to use multiple headers on their MX 212 instead of a single header a la Crystalfontz. I would guess that their rationale is that most users will only monitor 3-4 temperatures anyway, and it is easier to install and name the DOW probes when they are on separate headers. I can certainly agree with this; it can be a hassle to get the sensors on my old CF-633 to all end up in the right spot with the right name. Crystalfontz has another approach to dealing with this that we'll see later.
In addition to the DOW headers, there are three 3pin fan headers on the Matrix Orbital that allow for fan speed to be adjusted via software using pulse width
modulation (PWM). A floppy-disc style power connector plugs in below the fan headers to supply the unit with 12V voltage.
To the right of the white power connector is the header for the additional General Purpose Outputs (GPOs).
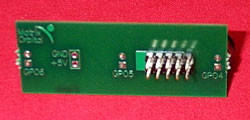
This is a feature that I have never seen before: the MX 212 has three voltage outputs that can be used to turn on and off all manner of accessories. To demonstrate the usefulness of the GPOs, Henry included a 3 LED indicator. This indicator has 3 blue LEDs and connects via a 10 pin header to the GPO header on the MX 212.
|
|
|
|
 |
|
 |
|
|
|
The package included a template for drilling holes into your bay cover or case for the LEDs and clear instructions in how to connect everything.
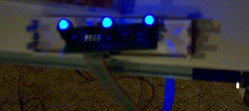
Once connected, you can use the LCDC software to turn on one or more of the LEDs, make them flash, or make them strobe. I set them to strobe when I pressed a button on the keypad, for instance. I couldn't manage a picture of this, so I just turned them all on and took a shot:
|
|
 |
|
TThis is a pretty cool feature, and it is trivial to make the GPOs do things like turning on relays and controlling larger lights. For that matter, a few LEDs could be used to light up your case if you have windows.
Documentation and installation
Matrix Orbital included a glossy sheet with instructions on how to install the MX 212 into a 5.25" bay of a case using the external USB header. They also
included instructions with the internal USB header for its assembly and installation. The LED indicator that connects to the GPOs shipped with also included instructions on its installation.
The LCDC software that is included with the MX 212 is also very well documented with a help file that explains all the features and options available.
Overall, I was extremely impressed with the lengths that Matrix Orbital has gone to in making their product user friendly for non-electronics people.
Installation was simple and straightforward.
I simply plugged in the floppy-style Molex power connector, the three DOW sensors, the internal USB cable, the LED indicator (to the GPOs), and my 2 120mm Enermax case fans. The LCD powered on and Windows detected a USB device and asked for a driver. I pointed Windows XP pro to the included installation CD where it detected a Matrix Orbital USB broadcast driver, gave it a COM port, and installed the necessary drivers. From there I installed the latest version of LCDC I downloaded from the creator's website and configured it for my system.
Software and Ease of Use
|
|
That brings us to what is arguably the most important part of an LCD package: the software. I was extremely impressed with the LCDC software
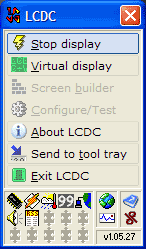
that was included with the MX 212. The LCDC software found the MX 212 on COM3 and was then ready for use. At that point I was ready to configure the unit. The LCDC application resides in the system
tray and when clicked has a small list of items that you can configure.
|
|
|
The top button stops and starts the LCDC screens from displaying, while the more useful menus for configuration are Screen Builder (the
preconfigured and user configured screens and events) and Configure/Test (the LCD's settings and connected accessories). LCDC has to be stopped before any configuration can take place.
Out of the box, the LCDC software worked surprisingly well.
It installs plugins for things like local weather, internal and external ip detection, network usage, winamp, kazaa usage, and many other things I didn't even try. When I first plugged in the unit, opened LCDC, and pressed "start" then the MX 212 started cycling through a large amount of well done screens. Here's the network usage for example:
|
|
|
|
 |
|
Once you have watched LCDC cycle a few times, you can set up all sorts of cool transitions from one screen to another and pick and choose and add screens very
easily from the screen builder menu.
|
|
|
|
| Random Forum Pic |
 |
| From Thread: Two pumps config - serial or paralell? |
|
| | ProCooling Poll: |
| So why the hell not? |
|
I agree!
|
 67% 67%
|
|
What?
|
 17% 17%
|
|
Hell NO!
|
 0% 0%
|
|
Worst Poll Ever.
|
 17% 17%
|
Total Votes:18Please Login to Vote!
|
|


 Matrix Orbital MX212 Vs Crystal Fonts 633 Shootout

