|
|
|
|
 Pro/LAN Pro/LAN
|
|
Date Posted: Oct 21 2002
|
|
Author: pHaestus
|
|
|
|
|
Posting Type: Article
|
|
Category: ProCooling Projects
|
|
Page: 1 of 5
|
|
Article Rank:No Rank Yet
Must Log In to Rank This Article
|
|
|
|
|
Note: This is a legacy article, imported from old code. Due to this some items on the page may not function as expected. Links, Colors, and some images may not be set correctly.
|
|
|
Pro/LAN By: pHaestus
|
|
|
|
The primary goal of this project was to put a high performance water cooling system into a mini/mid tower case for extreme portability. Since the function of the system is to be for LAN parties, then the secondary goal was to make it eye catching and above all professional.
I want to begin this article by acknowledging and thanking all the people who made this project possible. It is the support of sponsors that makes it possible for Procooling to still be around. The following vendors all contributed to this project:
|
|
|
|
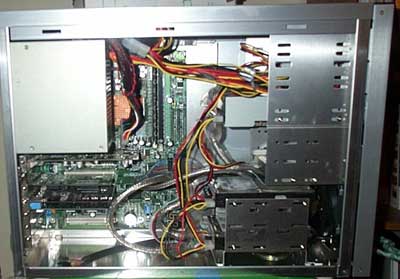
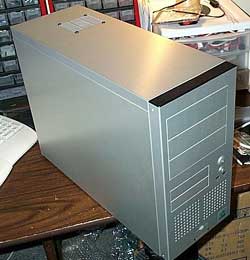
The case chosen was the Lian Li PC-50, reviewed here earlier. The PC-50 is actually the smallest case that I have ever owned. It has the familiar Lian Li brushed aluminum finish and front intake holes seen on most of their other cases. I personally dig the look, so I wasn't interested in making a lot of changes to the lines of the case. Instead, I was primarily concerned with taking an already cramped case and squeezing in a lot of extra cooling.
|
|
Two issues with this case required immediate attention and in the end were the major reasons that the final system turned out the way that it did. The placement of the PSU was not at all ideal for waterblocks (barbs and hoses would be a pain to mount) and its placement also made it rather pointless to add a window to the case. So I decided to move the PSU.
|
|
|
|
The other issue I had with the case was the stock 80mm fan louvres for the top blowhole. It looked crappy, in my opinion. If the fan had been centered, this wouldn't have been a big deal at all and I could simply replace it with a 120mm fan. Unfortunately, it was offset so that it could clear the PSU.
I disliked the look and decided that something must be done about that as well. I toyed with just cutting a rectangular hole up top and mounting the radiator in the top rear of the case. However, with the slide out motherboard tray and the small distance between roof of case and CPU socket, that wasn't an option. I had to come up with something else. You will see that most of the work associated with this project came from these two issues.
|
|
|
|
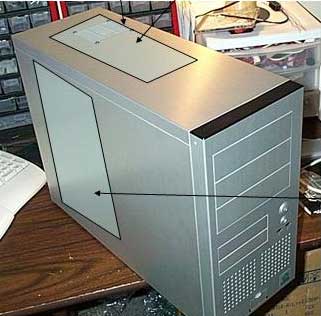
The point of no return for this project was when I decided to have windows cut into the top and side panels of the case. I came up with a relatively simple design that was still pretty distinctive. I know that some people do amazing things with dremels (e.g. www.jesder.com), but I didn't have the time or the patience to do all the cuts and filing myself. So, I sent the parts to www.aquadesignstudios.net and had Tim Sova do all the modifications professionally with a waterjet. Here is what I sent him along with the parts:
|
|
|
|
A few weeks later, I got everything back exactly as requested. As a bonus, Tim cut some snowflake design air vents in a 5.25" drive bay cover for me as well (for reasons to be seen later).
|
|
 |
|
|
|
I ran into the very first snag of the whole project when I got the panels back. The top window was slightly wider than the frame of the case. This meant there was no way to use a regular piece of acrylic for the window. I thought of a few possible solutions: cut a notch in the frame so that acrylic would fit, make an insert so that there would basically be a border around the cuts that I could then mount the window on, or try and score some extremely thin clear plastic. I had no luck with finding plastic of the right thickness at home improvement stores, but I eventually struck pay dirt at the picture frame section of Michael's (a craft store). There is a product called "Nonglass" that is used instead of glass for framing things like posters. A piece large enough for all of the windows set me back $4. It was crystal clear and thin enough that the top would mount properly on the case with the window added. I was happy with the way it looked, so I used some Plumber's Goop to glue it to the panels and was done.
Once I got the case windows cut up, there was no backing out. I HAD to find somewhere else to put the PSU or else all that anyone would ever see when looking into the case was a rather dull Sparkle 400W unit. I figured that I could either pay big dollars for a relatively low powered 1U PSU or I could try and modify the Sparkle 400W to fit in the top drive bays of the case. The second choice would provide more power for overclocking and didn't cost me any money so I went with it.
|
|
The inspiration for moving the PSU to the drive bays came from two places. First of all, a guy who goes by the handle Trust7 on forums had mounted an Enermax PSU in the top drive bay of a Lian Li PC-30 a couple of years ago. The case was shown at the CPL competition I believe. The other source of inspiration was this excellent article at Subzerotech
It only took a moment to realize that there was NO way I was fitting the Sparkle into a CD-ROM casing. The large capacitors and even larger heatsinks precluded this.
|
|
 |
|
|
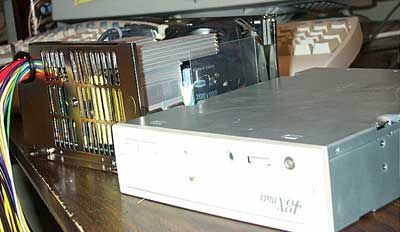
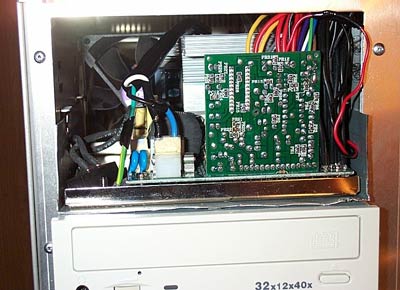
So, I went with a sort of hybrid technique. I cut away all of the PSU's casing except for the base and then Arctic Silver epoxied that base piece into the CD-ROM casing. With a bit of tweaking, this fit into the drive bays no problem. I used double-sided tape to hold a case fan in place at the rear of the PSU. This fan was designed to blow the heat of the PSU out of the case through air vents cut into a Lian Li faceplate. I next had to deal with the excess of wires in the PSU: the system was not running a P4 and so the extra 12V connector and auxillary power lines were taking up a lot of useful space and blocking airflow inside the mounted PSU. I cut them all back closely and heatshrinked them so nothing would short out. When I was finished, the mounted PSU looked like this:
|
|
 |
|
|
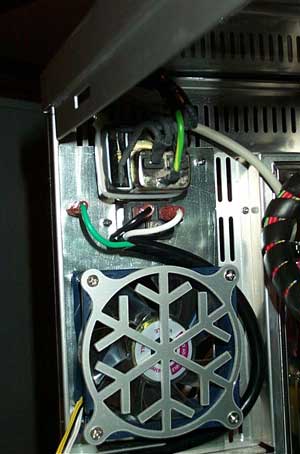
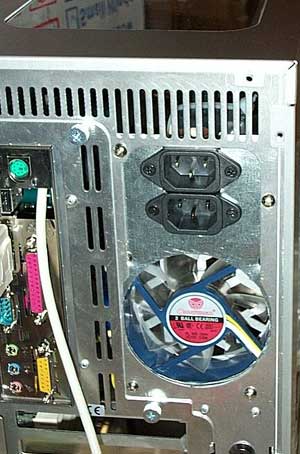
The Sparkle has some line smoothing circuitry on its AC connector. I carefully removed that from the original case for use later. I also cannibalized a power cord to get a long run of shielded cable for the power supply. Since it was going to be placed into the 5.25" bays, I had to also make a replacement back plate where a power supply normally goes into the case. If I had been wise, I would have carefully removed and saved the original PSU cover and used it. Instead, I had to make a new one. I used a piece of aluminum sheet metal, some tin snips, a hammer, and a nail for this job. I also added a second AC plug for the pump and a hole for an 80mm fan to this backplate. When it was finished it looked like this:
|
|
 |
|
 |
|
|
Overall, I was quite satisfied with the results. I just connected the pump's ground wire to the case to avoid two ground loops.
At this point, I had addressed the two major concerns of the system. The unattractive 80mm blowhole had been dealt with (rather drastically) and the PSU was now snugly placed into the drive bays and out of view. The next step was to work on the system's cooling.
|
|
|
|
|
|
|
|
|
|
|
ph shows off the cooling goodies  |
|
|
|
|
| Random Forum Pic |
 |
| From Thread: Building my own AMD cpu cooler |
|
| | ProCooling Poll: |
| So why the hell not? |
|
I agree!
|
 67% 67%
|
|
What?
|
 17% 17%
|
|
Hell NO!
|
 0% 0%
|
|
Worst Poll Ever.
|
 17% 17%
|
Total Votes:18Please Login to Vote!
|
|


 Pro/LAN

