|
|
|
|
 Using Socket A holes to Clamp down a waterblock. Using Socket A holes to Clamp down a waterblock.
|
|
Date Posted: Sep 16 2000
|
|
Author: Unaclocker
|
|
|
|
|
Posting Type: Article
|
|
Category: H2O and Evap
|
|
Page: 1 of 1
|
|
Article Rank:No Rank Yet
Must Log In to Rank This Article
|
|
|
|
|
Note: This is a legacy article, imported from old code. Due to this some items on the page may not function as expected. Links, Colors, and some images may not be set correctly.
|
|
|
Using Socket A holes to Clamp down a waterblock. By: Unaclocker
|
|
UnaClocker Clamps yer Socket A down
|
|
|
|
Ladies and gentlemen, I'd like to make your life a wee-bit easier. I have here a new fangled invention that it sure to please the wife and kids. It's called a Mouse Trap. Errr, strike that. As many have said before, AMD's chips run so hot they make Cyrix's look cold. So many many people are turning to water cooling to keep those chips cold. One of the big hurdles with a homemade waterblock is finding a good way to attach it to the CPU. I've seen many techniques. Such as:
|
|
- The rubber band between the tabs on the CPU socket.
- The zip ties between those tabs.
- Welded/soldered contraptions that clip onto those tabs.
|
|
|
|
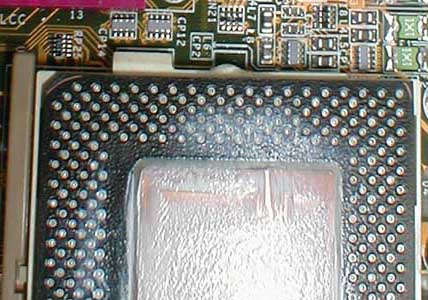
I think you see my general idea here. Those little tabs have been the key to attaching waterblocks. The only problem is that they can break off, just like this:
|
|
|
|
Yes, there is the bigger lug next to it, and judging by the damage in this picture, maybe that bigger lug should have been used in the first place, but still, those lugs aren't much to grab on to.. AMD has for some reason or another, provided us with an excellent new way to attach waterblocks.
|
|
|
|
|
|
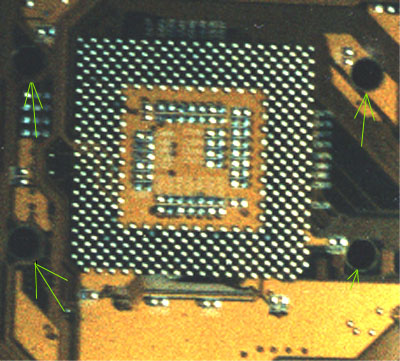
The Magic 4 holes on a Athon Mobo
|
|
 |
|
|
|
|
I added some nice arrows since my photography and my scanner suck major rear. What you see here are 4 holes, spaced evenly around the CPU socket. Now this won't do Intel people any good because it's only on Socket A boards, <BASH> but Intel people don't need to watercool (Ohh yeh they do :) - Ed), they aren't passin the big G like AMD people are. </BASH> Now there are several ways you can go about using these holes, probably the best and most permanent way would to be to get 2 nylon bolts, and stick them through on opposite corners, and then epoxy them into an immobile position. (I disclaim all liability for your soon to be null warranty). Then there is the less permant, and not so handy way to do it, which is how I did mine.
|
|
|
|
|
Wow Looks a lil like Frankenstein.. got a lil Neck Bolt action going on here :)
|
|
 |
|
Again, excuse me for the poor camera work, should of seen the picture before I spent 30 minutes on it in Photoshop. Anyway, here you see what I did. Using what I could find in my Bucket O' Bolts in the garage, I found 2 fairly long pieces of threaded metal (I dunno what you call them), I put two nuts that had the wrong kind of threads on the bottom, which works great, because they will never come off now.. Muahaha.. And as you can see, there is no grounding circle around these holes, so you'll DEFINITELY WANT TO INSULATE them. I used pieces of poster board, works great, and since this is the bottom of the motherboard, nobody has to see it unless you write an article like this one. Now the only problem with doing it like this, rather than using Epoxy, is that those "bolts" flap all over the place when your trying to mount the waterblock, and when your tightening down the nuts from above, you have to hold the threads to keep them from spinning also. Quite difficult to do with 2 hands. If you don't need your warranty, you'll be happier with the Epoxy, especially if you remove your waterblock often.
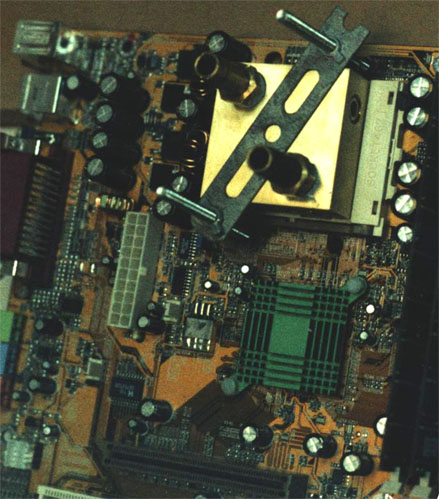
Now your probably wondering what you should use to go over the waterblock. Well my junk bin in the garage came in handy again, a piece of "plumbers tape". It's a strip of thin metal with evenly spaced holes in it. Works like a champ, as you can see below:
|
|
|
|
|
|
Now is that sweet or what? Just use a pair of Wing nuts on the threads, and it's very simple to do this. What you want to do is make sure the waterblock is sitting square and flat on the CPU core, then snug both sides up evenly. And generally, all you need to do is tighten it till the waterblock is fairly tight. About the time that you notice the middle of that metal strip start bowing up, it's plenty tight. I can confidently say that this technique is very safe for the core, as you know exactly how much downward force is being put on the CPU. I removed and reinstalled this block on that motherboard at least two dozen times, the core is still flawless. And since there are 4 holes, you can choose the position that works best for you when you put in the bolts (check which works best before epoxying please). :
|
|
|
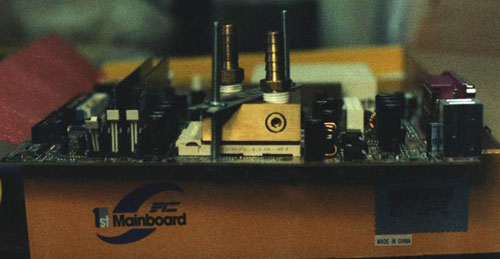
Here's one last shot of the finished product, a nice side shot.
|
|
|
|
|
|
All locked down with no where to go!
|
|
 |
|
|
|
|
Nice Looking Rig Eh? - Pictured with Una's Custom Brass Cooling Block
|
|
|
|
That about wraps this article up, If you have Questions please post them on the ProCooling Forums (recommended), or Email UnaClocker directly.
|
|
|
|
| Random Forum Pic |
 |
| From Thread: relatively portable, silent, passively cooled BEAST |
|
| | ProCooling Poll: |
| So why the hell not? |
|
I agree!
|
 67% 67%
|
|
What?
|
 17% 17%
|
|
Hell NO!
|
 0% 0%
|
|
Worst Poll Ever.
|
 17% 17%
|
Total Votes:18Please Login to Vote!
|
|


 Using Socket A holes to Clamp down a waterblock.
