|
|
|
|
 How to fill a closed loop cooling system How to fill a closed loop cooling system
|
|
Date Posted: Feb 11 2001
|
|
Author: Unaclocker
|
|
|
|
|
Posting Type: Article
|
|
Category: H2O and Evap
|
|
Page: 1 of 1
|
|
Article Rank:No Rank Yet
Must Log In to Rank This Article
|
|
|
|
|
Note: This is a legacy article, imported from old code. Due to this some items on the page may not function as expected. Links, Colors, and some images may not be set correctly.
|
|
|
How to fill a closed loop cooling system By: Unaclocker
|
|
How to Fill and Setup a Closed Loop Cooling System
|
|
|
|
Ok. I often get asked how a closed loop system works, how to fill it, or "Where's that line on that T in your system going?" So I decided a write up on the basics of this design would be a good idea.
Let's start with the basic theory, the water flows in a continuous loop, never pooling anywhere. In theory you could run a pump with nothing hooked to it. Just a hose running from the intake nozzle to the output nozzle. That's the most basic closed loop. Same theory works when you add a radiator and waterblock to that short loop.
Now what are the advantages to a closed loop? The number one advantage is that you don't have a reservoir of any kind taking up space in your system. You also obviously don't have a pump in that reservoir adding heat to the system, though a lot of systems with reservoirs don't either. Another advantage, is that without a reservoir, and being closed loop, your not going to have a problem with evaporation. Also being closed loop rather than a reservoir, you can turn turn the system upside down while it's running, or any which way, and you don't have to pray that the seal on the lid of your reservoir stays sealed, or worry that your pump is going to start sucking air because water in your reservoir just went sloshing away from your intake nozzle.
Alas, there are some disadvantages though. Such as filling the system, it's quite difficult, and is the primary reason I'm writing this article. Air bubbles are another big problem in closed loop systems, you have to plan ahead when designing the system to catch air bubbles, and seal the pump to prevent air from getting in.
So now that we have basic theory covered, let's move on to setting up the closed loop system, and filling it. We're going with my specialized technique, which involves leaving all but the waterblock inside the case. I had to develop this system because it is not possible to remove my pump and place it in a reservoir as Joe did in this article. I really couldn't have done my setup without that article, but I have some differences in my setup.
Ok, things you're going to need
|
|
- A towel (I don't like having water everywhere, especially considering I'm splashing it around INSIDE my case).
- A power strip with toggle switch with JUST the pump on it. (So you can turn the pump on and off easily without an electrical hazard)
- 2 2 quart pitchers of water (I use warm tap water, so I don't freeze my fingers) WITHOUT additive in it!
- Your additives (water wetter, glow dye, antifreeze, whatever makes you happy)
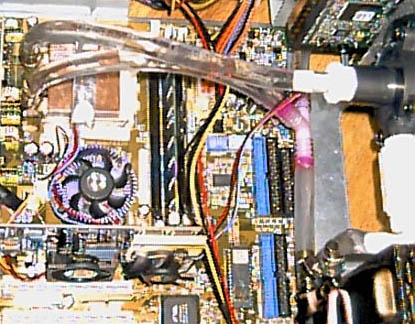
That about covers it. Now, setup your hoses, get them routed between your pump, radiator and waterblock the way you'd like them to be. Here's how my setup looks:
|
|
|
|
|
|
|
|
|
|
|
|
|
|
 |
|
|
|
I'll use this picture as an example now. I don't have the actual pictures of me filling the system because I have trouble taking pictures of myself. heh. Ok, the line running directly from the CPU to the pump is the pump intake, sucking the hot water off the CPU, and pushing it down into the radiator, after it's make it's 2 passes through the radiator, it goes back out, makes a left at the T and goes back to the CPU, and repeats. And as Joe covered in his article, the other line from that T just goes as high as it can in your case, and is capped off (I stuck a bolt in the top of mine. You'll want to have that capped off BEFORE you start filling the system, you'll have an awful mess if you turn on the pump with it uncapped. One really good idea before you start, plug one end of your loop with your thumb, and BLOW into the other end as hard as you can, you shouldn't be able to, which means you don't have any gaping holes anywhere.
To fill this system, with the case standing up, I set pitcher #1 right up against the side of the case, then I removed the line from the block that runs to the intake of my pump. I placed the waterblock with one line still connected to it into the pitcher of water. I've found that works well, because the weight of the waterblock keeps the hose IN the pitcher. Now we have the other end of the loop still outside of the bucket still.
And here comes the fun part. I found out the hard way that I couldn't just stick both ends in the bucket and turn on the pump, that doesn't work with mag drive pumps, they grind and tear themselves apart, and pump nothing. I also found out that if I suck most of the air out with my mouth, that doesn't work either, the pump just sits there bubbling away not pumping. So what you have to do is suck a mouth full of water, quickly plug the hose with your thumb, and spit the water back into the pitcher, and repeat this until most of the air is out of your system, or at least all of the air is out of your pump and the intake line your sucking from. THIS is why I say DO NOT add your additives yet. You don't want antifreeze in your mouth, you'll get a Darwin award when they find your dead body next to your computer. Same goes with glow dye and water wetter, they are not meant for your body. Now if your system has been filled before and has trace amounts, this seems to be ok, just blow as much of it out of the system as you can before you start sucking fresh water in. I've done that and didn't get sick. Keep any eye on the water level in your pitcher, make sure you don't start sucking air into the other end of your loop, use the second pitcher to keep the first one full enough to prevent that, but not so full that you can't put your hand into the water without a flood.
|
|
|
 |
|
|
|
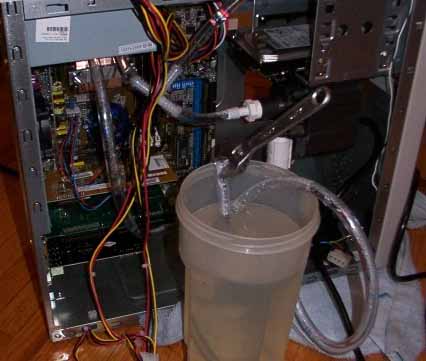
Here's a picture of the first time I filled a closed loop system, I hadn't discovered putting the waterblock into the picture yet, which is kind of a breakthrough on my new setup which allowed me to really shorten my hoses. The crescent wrench is just there to keep the hose from leaping out of the pitcher while I took the picture.
Now, after you've got most of the air out, you'll want to very carefully put the hose you were sucking from into the pitcher, making sure to keep your thumb over the end until it's under water so air doesn't get right back into the lines. (a little bit is ok, the pump should have enough momentum to keep pumping, but too much and the pump will just stall and you'll be sucking some more. Now hit the toggle switch on your power strip, while holding the hoses down in the water, and the towel over the top of the pitcher to prevent a geyser from erupting from your waterblock and soaking your system. Keep an eye on the water level while your doing this, if your system works like mine, the line that you were sucking from is not the intake, so the water is flowing in the opposite direction. I usually run the pump for about 1 minute, shut it off for 5 minutes, tap the impeller housing of the pump to dislodge any bubbles, and wiggle the computer as much as is feasible considering it's hooked to a pitcher of water still. Then turn the pump back on, on and off a few times, you should get all the bubbles out, make sure you have the intake nozzle below the output nozzle so that you don't suck air back into the system just as fast as your pump pumps them out.
Now for filling your air trap T line. While you have the pump on, slowly open the cap you put in the top of the line, in my case, I slowly slide the bolt out to the threaded part. Watch the water level slowly rise in the line, until it gets about 1" from the top, then close it off and tighten it shut.
You can also tell how your flow rate is doing now, if the water is coming out of the block as it was in my system, it'll probably be forming a moderate geyser, if it's flowing out the other hose, then you should be able to pull that hose out of the water carefully and see water rushing out of it. If you have a good way of keeping your pitcher full, you can empty the other pitcher and time how long it takes to fill the other pitcher with your hose, 2 quarts is half a gallon, so multiplier the time it took by 2, and you'll know how long it takes to pump a gallon through your system. 1 minute, and your pump is moving 60gph, 2 minutes is 30gph, and so on. But that's just for fun and recreation, you don't need to do that.
Now, your ready to start adding your additives. You want to do this with the pump ON to help mix things well. The great thing about doing this in a 2 quart pitcher is that you know almost exactly how much water is in your system. Round it off to 2 quarts (which like I just said is 1/2 of a gallon) and you'll be fine. I recommend this guide on proper proportions. You just have to cut his amounts in half, as he's dealing with 1 gallon of water, and you've got 1/2. Let the system run another 5 minutes or more after adding the chemicals to insure a good mix.
And finally, turn off your pump, and VERY CAREFULLY without letting either hose near the surface of the water, slide the free hose onto it's connector on the waterblock. You can now pull the waterblock out of the water and dry it off with your towel. After it's thoroughly dry you can mount it onto your CPU just like you normally would. One trick I did here, was after I had the lines both on the block, I turned the pump on, and put the case on it's side, then upside down, which got some hidden air bubbles into the water. I then flipped the case back over, shut off the pump, put the water block back into the water, disconnected a hose, and let the bubbles out of the system again. This seemed to work great because after a day of running, my water level in the T line is unchanged.
And that's all there is to it, follow the general safety guidelines, such as use clamps on every fitting, and run the pump for 1 to 6 hours to be sure you have no leaks or drips. Thanks, and I hope this helps you with your system. If you have questions or suggestions, email me, I love innovative new ideas, and don't mind clarifying anything I didn't make clear enough.
|
|
That about wraps this article up, If you have Questions please post them on the ProCooling Forums (recommended), or Email UnaClocker directly.
|
|
|
|
Articles Home
|
|
|
|
|
|
| Random Forum Pic |
 |
| From Thread: peltier help |
|
| | ProCooling Poll: |
| So why the hell not? |
|
I agree!
|
 67% 67%
|
|
What?
|
 17% 17%
|
|
Hell NO!
|
 0% 0%
|
|
Worst Poll Ever.
|
 17% 17%
|
Total Votes:18Please Login to Vote!
|
|


 How to fill a closed loop cooling system

