|
|
|
|
 Mounting and Sealing a Waterblock/TEC Mounting and Sealing a Waterblock/TEC
|
|
Date Posted: Feb 19 2001
|
|
Author: OnDaEdg
|
|
|
|
|
Posting Type: Article
|
|
Category: High End Cooling
|
|
Page: 1 of 1
|
|
Article Rank:No Rank Yet
Must Log In to Rank This Article
|
|
|
|
|
Note: This is a legacy article, imported from old code. Due to this some items on the page may not function as expected. Links, Colors, and some images may not be set correctly.
|
|
|
Mounting and Sealing a Waterblock/TEC By: OnDaEdg
|
|
Mounting the Block and Keeping the condensation away
|
|
|
|
Well, we're nearing the completion of my watercooling system. Thus far, the radiator, waterblock, and the video card portions of the project have all been completed (note: the video card cooling system will be different than the article). They can be read here: How to Mount your Radidator , Make'n a Copper Waterblock , and The Ultimate Video Cooler .
Now it's time to go ahead and get the waterblock, peltier, and cold plate mounted to the cpu. Originally, I had purchased one of those aluminum bar clamps with the bolt/nut combination adjusters for tightening of the block to the cpu. However, I found that there was no way that I could possibly make sure that the waterblock/pelt/cold plate was being pressed flush against the cpu with that type of tightening system. I visited my usual list of sites in which I periodically buy cooling products from to see if anyone had a device that appeared to solve the problem of mounting the waterblock correctly. Although there were several good ideas, I didn't see any that looked to be the perfect solution. My next thought was to start up a small contest awarding the person with the best waterblock clamp a free peltier. The contest was very helpful and you can read or even view some of the entries here: Contest- Best waterblock hold down device will win a free 56watt pelt! . After taking in as much information as I could, I decided that a clamp that placed pressure on the waterblock directly over the cpu plug was the best solution for an Intel platform which I am currently using. Now that I have decided on a basic design, how am I going to implement this idea? Read on to discover the answer.
|
|
|
|
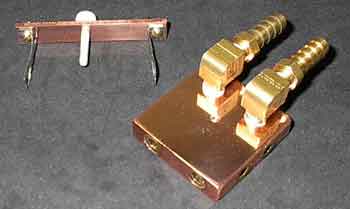
The first thing I needed was some type of device to attach to the plastic tabs of the socket. I visited Home Depot and went through their odds and ends in the bolt section and found nothing. I came home, glanced at the original clamp I had purchased and decided I was going to use those bow-tie looking things that had come with it. Well, that solves problem number one. The second problem I had was what was I going to use as the main piece for the clamp? Since I was using a copper waterblock, I decided I wanted to use a copper hold down device so I took a sheet of 1/8in copper, and cut a strip one half inch wide by three inches long. I sanded it up a little bit to make perty. Now that I have the clamps and the main piece, how am I going to attach it all together to get a worthwhile waterblock clamp? Since the bow-tie looking clamps have holes on the end for a bolt, I decided to drill a hole through the ends of the main copper piece. I would then tap it to hold a 6-32 machine screw. I went to Home Depot and purchased a 6-32 tap, some screws, and I happened to find a plastic threaded 8-32 thumb screw. This would be perfect for the center bolt to push down the waterblock over the cpu. So I grabbed an 8-32 tap as well.
|
|
|
|
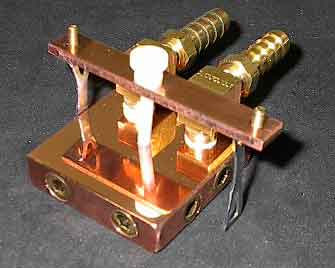
When I got home, I took out the main copper piece and drilled it out 1/8 of an inch from the very ends. I then tapped them for the 6-32 screws. I held the bow-tie clamps up to them, inserted the screws, and tightened it nice and tight. Great! It came out perfect. I then installed the waterblock clamp over the cpu slug for a trial run and it worked perfectly. Now I have to decide where to drill the hole for the center thumbscrew. Using the judgment of the good ole eyeball, I placed a mark where the cpu was directly overhead the copper bar, then centered it. This was where I was going to place the thumbscrew. I drilled it out, then tapped it with the 8-32 tap and screwed in the thumbscrew. I then threw it on the socket and tested it and it too came out perfect. So far, this has been great luck! Now, all we got to do was throw the watergblock/pelt/cold plate on and screw it down. Then a thought occurred to me. I don't really want to be taking the motherboard out of the case each time I take the waterblock off. So how can I mount the waterblock without it sliding around until I have it nice and tight? A few minutes of thought and BOOM!, a brainstorm hit me. What if I drilled a small indentation into the waterblock that would be big enough for the end of the thumbscrew to fit in and hold in place? This was a great idea. Since there is no channel running through the very center of my waterblock, this would not pose a problem of any kind to the block. Besides, I only have to make the small indentation deep enough so that the thumbscrew could rest in it just enough to not be able to slide around laterally. To measure where to do this on the waterblock was easy because the cpu slug is directly over the very center of the 2x2 waterblock. So I just drilled out a small indentation into the block in the very center. I threw everything on and installed the clamp. It just so happened that it fit perfectly. The thumbscrew fit in it perfectly and the waterblock wouldn't move at all in any direction. I had no problem with it sliding around even when I installed the waterblock with the motherboard in the case. Thanks to the many ideas you guys gave me, the waterblock clamp is a complete success. It is sturdy, reliable, and it looks good as well. Thus far, I have been sticking to the guidelines for my watercooling system I laid out early in my first article. Here are the 5 guidelines again:
|
|
|
|
- It must operate as reliably as an air cooled heatsink for extended period of time.
- It must be fully enclosed inside the case itself.
- There must be no leakage or condensation whatsoever.
- It must run quietly
- The ladies must dig it! (In other words, it must look good)
|
|
|
|
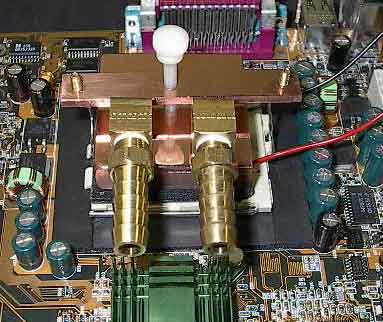
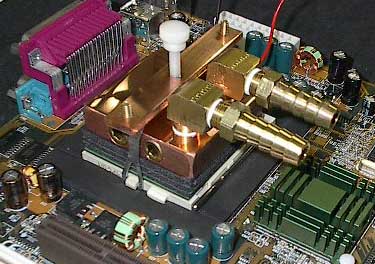
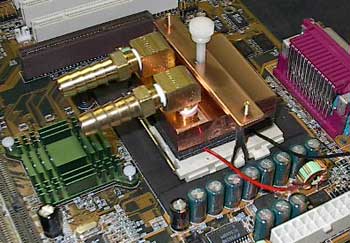
Now that the waterblock clamp is done, let's look at a few pictures so that you can get a better idea of how I implemented my design:
If you look close enough to the very center of the waterblock in the picture below, you will notice the small drilled indentation in the block. This is where the thumbscrew will insert for better control and reliability.
|
|
|
|
The next three pictures show the waterblock mounted to the socket:
|
|
|
|
Well, the waterblock is done. Also, some of you may notice that the hose barbs are no longer coming from the sides of the block, but are exiting the top using a 90 degree elbow design. This was necessary due to the fact that the ram stick on the motherboard gets in the way of the hosing connected to the block. The 90 degree elbow allowed the hose to travel over the ram stick rather than pushing against it. Although I already have the peltier and insulation installed in these pics, I will later show you how to correctly keep your system condensation free and give you the final article on the results of the whole system. Until then, OnDaEdg is out!
|
|
|
|
| Random Forum Pic |
 |
| From Thread: Auto-reversing pump? |
|
| | ProCooling Poll: |
| So why the hell not? |
|
I agree!
|
 67% 67%
|
|
What?
|
 17% 17%
|
|
Hell NO!
|
 0% 0%
|
|
Worst Poll Ever.
|
 17% 17%
|
Total Votes:18Please Login to Vote!
|
|


 Mounting and Sealing a Waterblock/TEC
