|
|
|
|
 Clamping down a TEC/Peltier Clamping down a TEC/Peltier
|
|
Date Posted: Jul 20 2001
|
|
Author: OnDaEdg
|
|
|
|
|
Posting Type: Article
|
|
Category: High End Cooling
|
|
Page: 1 of 1
|
|
Article Rank:No Rank Yet
Must Log In to Rank This Article
|
|
|
|
|
Note: This is a legacy article, imported from old code. Due to this some items on the page may not function as expected. Links, Colors, and some images may not be set correctly.
|
|
|
Clamping down a TEC/Peltier By: OnDaEdg
|
|
Clamping The Peltier: Just How Important Is It?
|
|
|
By: OnDaEdg
|
|
|
Initially, I was going to give a how-to on pelt-cooling a T-Bird. After a little bit of experimentation, I soon discovered that this is no easy task. However, I did manage to come up with a neat idea that improved my T-Bird temperatures by 20 degrees (F) using a 172 watt pelt. The complete how-to will come later. For now, I will provide this information that I believe will help a lot of you overcome your poor pelt performance. Let's get started!
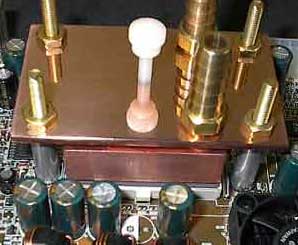
First off, I achieved this performance improvement using a Maze1 block and 172 watt pelt from Danger-Den/TE Distributing. Here is a picture of my current setup:
|
|
|
|
|
|
|
|
|
|
|
|
|
|
|
|
 |
|
|
|
As you can see, it is a pretty impressive waterblock mount. When I decided to use a peltier, I figured that all I had to do was add the peltier and a cold plate. I would then provide the clamping pressure using the plastic screw pictured above. Upon trying this, my temperatures were nowhere near what I had expected. A little confused, I went to some of the forums and looked up what others had achieved using this same pelt. It seemed I was not alone. Many had decided that using a pelt on a T-Bird was just not worth it. The only thing I could come up with is I was not providing enough clamping pressure on the peltier with the cold plate and the waterblock.
I was curious what AMD's spec sheet says on how much pressure should be placed on the cpu by the heatsink so I contacted Joe Citarella over at overclockers.com . He informed me that it was 16-24 pounds of pressure. Now, I had to find out how much pressure a peltier is required to have in order to operate to its fullest potential . I hopped on over to Melcor.com and found this bit of information: "The recommended compression for a TEC assembly is 150 to 300 pounds per square inch of module surface area."
Wow! A TEC assembly requires 6 to 12 times more pressure than the cpu does. Using the screw on my mounting device is not going to suffice. Actually, this is an extreme understatement, but I am sure you figured that out on your own. Now that I have discovered I am lacking mounting pressure on the TEC, how am I going to fix this? I really didn't want to have to design a whole new block/mounting system since the one I am currently using works so well. While examining the Maze1 block hoping an idea would pop into my head, I noticed that there seemed to be a tiny bit of room at each corner of the block. Perhaps enough room for a small screw to fit through. Due to the fact that I can not see inside the block, I could not visually tell how much space there was before I reached one of the channels. When you have no idea how much space is in there, I say "What the hell!" and I go for it.
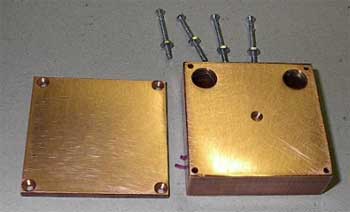
Taking a 3/32 drill bit, I drilled a hole in all four corners of the block straight through. I was extremely careful to try and get the holes as close to the corner as possible. After drilling the four holes, I inspected the block to see if I could tell if I had entered a channel or not. As far as I could tell visually, I had not and all was well. I hooked it up and ran water through it just to be safe and this confirmed it. Now, I had to run over to the hobby shop and get some screws. The guy at the hobby shop had a small bag of screws and assorted stuff and just let me pick through it for whatever I needed. I found four screws that worked perfect as well as the nuts to go with them. I do not know the size on these screws, but I suspect that they are maybe a #2 screw. I do know that they are smaller than a 4-40 screw that you could find at a hardware store. A 4-40 was too big so the hobby shop was my only choice and I got lucky. To sandwich the pelt to the waterblock, I had to drill mounting holes in the cold plate. Using a 1/8th piece of copper, I cut a square piece 51mm by 51mm. I also decided that to prevent the bottom of the screws from touching the cpu, that I was going to flush-mount them into the cold plate. Let's take a look at what I have achieved so far:
|
|
|
|
 |
|
|
|
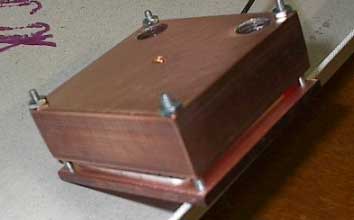
I know some of you who own a Maze1 block are wondering what that little "dimple" in the center of the block is from. That is a small hole I drilled in the very center of the top of the block to allow the plastic screw to hold the block in place not only vertically, but also horizontally. The hole does not go all the way through the top piece. It is just a small indentation deep enough for the plastic screw to rest in it without allowing the block to move in any direction. And here is the entire assembly with the pelt in between:
|
|
|
|
 |
|
|
|
Now I can really apply some pressure onto the peltier. I quickly threw the block into my mounting device, powered up my supplies to provide me with 22-24 volts (You can see how I did this here ).
After booting into windows and running Prime95 torture test at 1600 mhz, the temperature stabilized a full 20 degrees (F) less than it had without this type of clamping mechanism. I am usually ecstatic when I make a small modification that results in a three to five degree improvement. A twenty degree improvement, now that is something to be really excited about. I am not going to post temperatures here because I don't want to let the cat out of the bag yet. All this article is meant to do is emphasize the importance of placing an extremely high amount of pressure on the TEC assembly (cold plate/pelt/waterblock).
Well, I hope this helps you pelt-users. It clearly illustrates the need to place a lot of pressure onto the thermoelectric cooler INDEPENDENT of the pressure placed onto the cpu. I am going to do a little more testing with another block and mount I have come up with and will let you guys know how it performs in my final article on pelt cooling a T-Bird. Also, stay tuned as Xjinn and I are working on providing you with some information on using thermal solder as an alternative to thermal pastes.
Until then, Ondaedg is out!
|
|
|
|
That about wraps this article up, If you have Questions please post them on the Pro/Chat (recommended) or Pro/Forums, or Email OnDaEdg directly.
|
|
|
Articles Home |
|
|
|
| Random Forum Pic |
 |
| From Thread: blocks with "poly" tops. |
|
| | ProCooling Poll: |
| So why the hell not? |
|
I agree!
|
 67% 67%
|
|
What?
|
 17% 17%
|
|
Hell NO!
|
 0% 0%
|
|
Worst Poll Ever.
|
 17% 17%
|
Total Votes:18Please Login to Vote!
|
|


 Clamping down a TEC/Peltier


