|
|
|
|
 Installing an Under-Core temp probe Installing an Under-Core temp probe
|
|
Date Posted: May 30 2001
|
|
Author: Joe
|
|
|
|
|
Posting Type: Article
|
|
Category: Hardware Modding
|
|
Page: 1 of 1
|
|
Article Rank:No Rank Yet
Must Log In to Rank This Article
|
|
|
|
|
Note: This is a legacy article, imported from old code. Due to this some items on the page may not function as expected. Links, Colors, and some images may not be set correctly.
|
|
|
Installing an Under-Core temp probe By: Joe
|
|
Getting the correct core temp from your CPU!s
|
|
|
|
Ever since CPU's have gone to the realm of 75 - 100 and now 150 watts of heat when OC'n, Temp management and tracking is VERY critical. At 150watts of heat ( Tbird at 2.4Vcore @ 1.6Ghz) if you don't have some way of keeping accurate track of your temps you are risking not only killing the core, but starting a fire ( or low yield nuclear explosion ). We know that the new Athlon4's and the P3's all use thermal diodes for temp gathering on the core, but I always want a second opinion.
I don't want to see any city blocks whipped out due to some Tbird going critical via a fan die'n, Block popping off, pump die, or any one of a million things that can cause it.
|
|
The ole standby - The Mobo Probe:
|
|
|
|
Most every AMD and Intel Mobo have these in them. The Lil bastard probes. I call them a lil bastard due to how inaccurate, and also that I have had some fail to warn of a critical temp.
The main reason for these not telling you when your CPU is at 200DegC and rising is mainly due to user error. If you don't bend the probe up and have it touch the bottom of the core, then its all but useless.
You notice the small dark blue area in the white paint on the thermistor? That's the ONLY contact area of the entire probe. This is why the probe is so inaccurate for precise temp readings.
in all fairness, the probes to work for most people. they do help save CPU's in many cases. Unfortunately .... by the time they know a problem has happened the lil AMD block-o-sand has already turned to magma.
|
|
|
Adding a small drop of Thermal paste onto the bottom of the CPU Plate where the thermal probe contacts it will aid slightly in their accuracy, but only a slight bit. Another issue is that the probes are almost never under the core, they mostly off to the side. This is one reason that by the time the probe senses the heat up of the core from the time the cooler falls off of it, the core is LONG since expired.
|
|
|
|
The way many people who are worried about CPU temp can go about safe guarding the core is by using a DD5 or a CNurse to monitor core temps. By stripping off all the excess insulation like CK42 did on this thermal probe and putting the thermistor on the side of the core you can get some very accurate temp readings and a much faster reaction time ( depending on the resolution rate of the temp reading device) to shut the system down if it overheats.
This is still not a exacting temp reading and the space available for the probe is EXTREMELY thin ( as thin as the core).
Using CK42's thermal shutdown system that was just wrote up here, you could make a very good Core fail-safe system with this mounting method.
|
|
|
its also difficult to make sure the thermal probe is still exactly on the side of the core cause with such a small contact area ( top of the probe) a small gap will throw off the readings in the case of a quick CPU heat up ( loss of a HSF off the core) and wouldn't kill the power till the core smokes.
|
|
|
Now onto the main part of the article:
|
|
How to get an Accurate under the core temp reading.
|
|
|
|
|
|
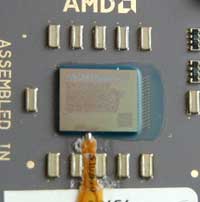
Now combining the out of sight and hard to disturb Under the core temp probe, and better accuracy then the top probe, notice the lil yellow wire in the pic. The Lil yellow temp probe wire that runs under the Duron. yet the Duron works, and sits perfectly flat.
We will get onto how in a sec, but there are some things that seem to be forgotten by some people.
When I brought this up at times, I was told "Just slide the wire under the core and push the core down to get it to catch on the ZIF socket connectors and hold it in place. " That will NOT work. The reason is that the Core is now on an angle and more then likely some pins on the CPU will not touch the ZIF connectors. A core that's crooked will give terrible temp results as you will never get the HSF on straight, and will prolly kill the core By cracking it or parts off it.
|
|
|
So now that we have established why you cant just slide the wire under lets look at how you CAN do it.
|
|
|
|
First thing you need to do is find wires that will fit between the pins. Make SURE you do not force wires too big between the pin rows or under pressure you will possibly breach the insulation and short a row of pins = Big smoke.
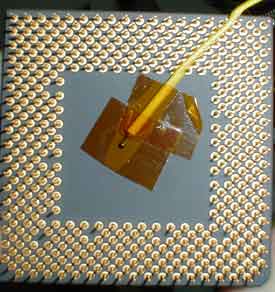
28gauge and smaller wire works great to run one wire per row ( for a thermistor it would be one + line and one - Line. Most thermocouples run in one solid wire ( a wire pair inside one roll of insulation) The Thermocouple wire is an oval shape so in the pic you can see how its twisted from vertical between the pins to flat along the base of the core.
In this pic you can see that its slightly off center, this was just a test, if this were an actual setup it would be dead center.
Thermal paste? On a thermistor, you can use some as the probe is already insulated and AS and other conductive thermal pastes would not affect it. Thermocouples are exposed and using something conductive / capacative as AS could throw off the calibration. Using a non conductive paste would work, but use VERY little as you will make it harder for tape to hold it in place.
|
|
|
Now lets get this thing all worked out.
|
|
|
|
|
|
|
|
 |
|
|
|
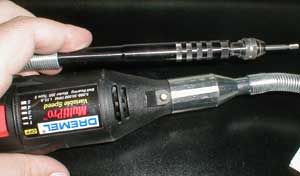
As with any mod you will need a dremel. I mean this goes without saying. You show me many projects where a dremel doesn't come in handy?
|
|
|
|
|
 |
|
|
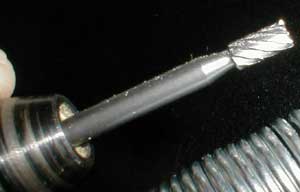
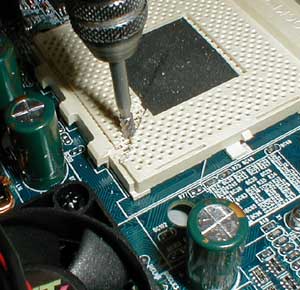
The bit you will need is #194 its a high speed cutter, with a flat bottom like that, so the cutter is a cylinder and not a point on the bottom. This is very critical, cause if you have a pointed or rounded bottom you will more then likely kill your socket.
|
|
|
|
|
|
|
|
|
|
 |
|
|
|
Also you would risk pressing the wires too hard against the pins and possibly expose the wire.
Below is how it should look when done. ( this was before I went and cleaned it all up.)
|
|
 |
|
|
|
|
|
|
|
|
|
Ok Now here comes the critical part. Take the pin row that you picked to run the thermal probe down he CPU, line it or the 2 pin rows you are using for wires and mark them.
IMPORTANT: ALWAYS do the run on the bottom row (like I did) if you do it on the side you will GREATLY decrease the sockets ability to pull the CPU into the ZIF contacts securely. Make sure its off to the side of the 3 lugs or you will have issues getting HSF's on and off without disturbing the thermal probe wires.
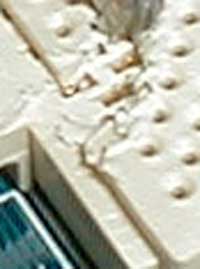
Once you have traced where the lines are to be run, take the dremel and as shown in the pic to the left, and cut away the TOP PLASTIC PLATE. Please look at the pic below, I NEVER modified or harmed the socket itself, I only cut out the top ZIF lock plate. Clean it up with a file, and make it clear for the wires to run. This is VERY important. If you leave debris in the channel you have made you may damage the socket when you try to set a CPU in the socket.
|
|
|
Close Up
|
|
|
 |
|
|
|
|
|
|
One thing I think is necessary for a number of reasons is a piece of neoprene in the socket. This gives you 3 things.
- Keeps the Mobo sensor well out of the way
- Isolates the bottom of the CPU from the environment and it will keep the temp readings more accurate.
- Will give added pressure against the thermal probe to rest against the surface of the core.
|
|
|
What has this given us?
|
|
|
|
|
|
|
By removing the ZIF tension plate from that area you have opened a 1mm gap between the core and the socket. Allowing us to run a 28+ Guage wire between the socket and CPU. If you have a 2 wire setup you will need to make the groove bigger then I did.
|
|
|
|
|
|
|
|
|
|
|
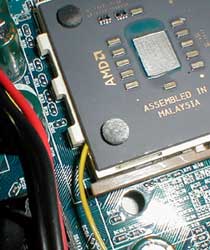 |
When you push the CPU down in the socket you need to make sure that the CPU rests on its own and does NOT get held up on the wire. if it does you need to make the channel bigger or clean it more from plastic shavings.
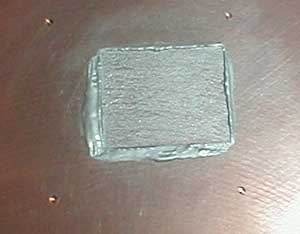
Since getting your CPU perfectly flat on the socket is so important you will want to hold it from 3 places with one hand and make sure its flat. The neoprene will try and lift the core up so its very important to keep one hand squarely on it and hold it down while you clamp the CPU in.
An easy way to test if the core is square is to put a HSF on it and see what kind of core impression it makes with the thermal paste.
|
|
|
|
|
 |
|
|
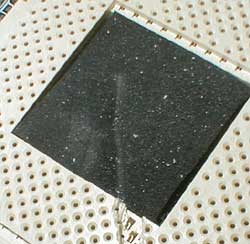
This was the core impression from one of my test durons, on a Thermalright Cu HSF. As you can see it was a perfectly flat contact.
So now, does it take accurate temps?
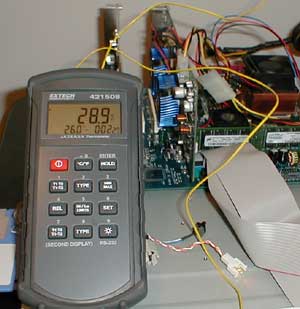
YES. the temps were about 10 Deg different ( most of the time hotter) then the Mobo temp reader. It's 5Deg different in some direction ( +/-) then the top of the CPU probe.
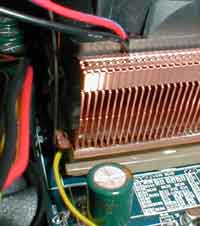
In the pic below you can see how small of an area the thermal probe wire takes.
|
|
|
|
|
|
 |
|
 |
|
|
|
BTW: notice the 3Deg above ambient temps? That HSF isn't too bad. A Thanks goes out to KDComputers for the HSF.
|
|
|
|
That about wraps this article up, If you have Questions please post them on the ProCooling Forums (recommended), or Email Joe directly.
|
|
|
|
| Random Forum Pic |
 |
| From Thread: Post pictures of your homebuilt blocks here! |
|
| | ProCooling Poll: |
| So why the hell not? |
|
I agree!
|
 67% 67%
|
|
What?
|
 17% 17%
|
|
Hell NO!
|
 0% 0%
|
|
Worst Poll Ever.
|
 17% 17%
|
Total Votes:18Please Login to Vote!
|
|


 Installing an Under-Core temp probe
