|
|
|
|
 Cooltechnica AquaExtreme XG Case Review Cooltechnica AquaExtreme XG Case Review
|
|
Date Posted: Jul 22 2002
|
|
Author: pHaestus
|
|
|
|
|
Posting Type: Review
|
|
Category: Case Reviews
|
|
Page: 1 of 3
|
Article Rank: from 1 Readers
Must Log In to Rank This Article from 1 Readers
Must Log In to Rank This Article
|
|
|
|
|
Note: This is a legacy article, imported from old code. Due to this some items on the page may not function as expected. Links, Colors, and some images may not be set correctly.
|
|
|
Cooltechnica AquaExtreme XG Case Review By: pHaestus
|
|
 |
|
Water cooling is becoming main stream.
There is no avoiding it. You can go into some CompUSA's and purchase Koolance water-cooled cases. Water cooling has for a while now been moving from a home workshop/DIY/fringe project to a much more expensive, slick, professionally produced product. Companies are springing up to provide parts and services for this niche market of H2O aficionados that is growing every day. One such company that has a rather interesting approach to the water cooling market is Cooltechnica.
Rather than machining and producing their own products and incurring all the costs (and time) of research and development, Cooltechnica acts as a reseller for some of the most respected (by Americans) watercooling
manufacturers: Dangerden, Swiftech, and HWLabs.
One of Cooltechnica's strengths is that someone looking for a complete cooling system can mix and match pumps, radiators, and blocks from different manufacturers and create a customized AquaXtreme kit that suits their budget and needs.
|
|
|
|
Cooltechnica's newest flagship product is a barebones system that includes an aluminum case, a customizable water cooling setup, and optional
features such as temperature monitoring and fan control.
The package can be purchased with the cooling system completely installed and filled with water. All the end user needs to do is add a system. This package is called the AquaXtreme XGL. Cooltechnica also gives the more technically-minded the option to install the cooling system themselves with the AquaXtreme XG package. The XG system is an interesting approach, because case modifications such as blowholes are performed by Cooltechnica while the actual cooling loop assembly, pump wiring, and system filling are done by the customer. This seems to me like a good compromise for those who want the satisfaction of doing it themselves but who are without power tools or the cajones to take a dremel to a $160 aluminum case.
Today, I will be reviewing the AquaExtreme XG package from Cooltechnica and discussing its components, assembly, and performance in some detail.
|
|
|
|
|
|
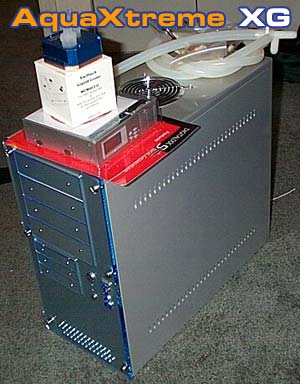
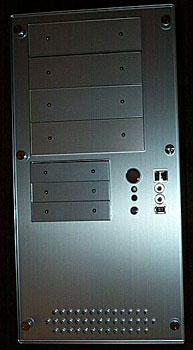
The AMS G Tower case: The aluminum case with plexi faceplate that houses Cooltechnica's AquaXtreme kit is most likely what got your attention for this review. It is a definite eye catcher. The case is pretty packed with features: plenty of drive bays (4 5.25" external, 3 3.5" external, and 4 3.5" internal), thumbscrews throughout the case, multimedia ports (mic, headphones, USB, firewire) on the front bezel, and an aluminum construction. The front bezel of the case I am reviewing is a light blue tinted plexi that looks very nice in person. All of the removable parts (HDD cage, PSU plate, PCI slots, side panels) came on and off without any effort. All of the edges on the G Tower are folded over, and I didn't get a single nick working in this case.
|
|
|
|
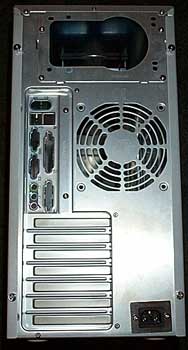
The case's cooling is reasonably good: there is a 120mm exhaust and an 80mm intake. The intake is pretty obstructed, and there are only a few
drilled holes in the lower front to let air into the case. With a 120mm exhaust, PSU fans, and possibly an optional 120mm blowhole, this case will probably have negative pressure. The side panels have
louvres to allow air to come in from outside if powerful exhausts are used.
The case ships with a single (and relatively loud) 80mm Delta intake fan in front of the HDDs, and a single Delta 120mm fan.
|
|
|
|
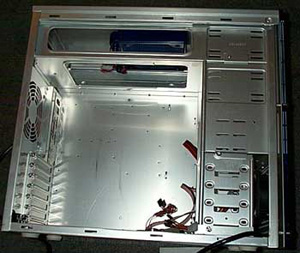
I have used several different aluminum cases, and the AMS G Tower is by far the most solid of them. The frame is reinforced in several places, and the
side panels are nice and thick.
The case is also noticeably wider than my Lian Li or Skyhawk mid-tower, which is definitely a good thing. I like my cases to be deep and wide, as it makes using large fans and adding water cooling much simpler. The finish of the G Tower is also excellent. Lian Lis have a brushed aluminum finish that everyone probably is aware of, and the G Tower is also brushed aluminum. However, AMS used a different process that resulted in only faintly brushed, much higher gloss finish on the top and sides. You can see from the picture of the louvres and side panel above that it looks very nice. In fact, if looks are the only consideration, the G Tower definitely outclasses the Lian Li mid-towers: the blue and orange LEDs, the blue tinted plexi front, and the shiny finish make it a really distinctive case.
|
|
|
|
Cooltechnica's case mods: While the case in stock form is nice, Cooltechnica went the extra mile and modified it to make it more suitable to water coolers.
First of all, the stock case had a design flaw that made using dual fan PSUs (like Enermaxes) not possible. Cooltechnica modified the PSU bracket so that dual fan PSUs will now fit in the G Tower. It was suggested to me that the fan grille be removed from the 92mm fan, but I managed to squeeze a 350W Enermax in without even doing that.
|
|
|
|
|
 |
|
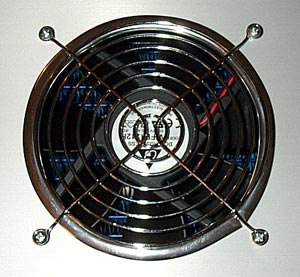
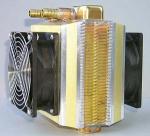
A much more visible modification is the addition of a top blowhole. The blowhole cutout was trimmed in chrome molding, and a chrome fan grill was bolted down on
the outside of the case.
The blowhole is sized for a 120mm fan, and it is necessary to mount the radiator on this fan for some motherboard/waterblock combinations.
You can see the blue Black Ice Pro beneath the Delta fan in the picture.
|
|
|
 |
|
|
|
|
|
Another modification that was made by Cooltechnica was the addition of a plug for pump on the back of the case. This is a nice mod for water coolers since
you have to get 110VAC to the pump somehow. The second plug is located next to the bottom PCI slots on the back rear of the case.
|
|
|
|
|
|
Issues with the G Tower: The major problem with the G Tower's design is the incompatibility with PSUs that have a 92mm fan on the bottom (Enermaxes, HECs, and many Antecs). Cooltechnica solved this problem, and so the only remaining gripe that I have concerns the multimedia ports. AMS decided to make the mic and headphone ports compatible only with certain motherboards (which have headers for these ports). My Epox 8K7A+ doesn't have these headers, and so I have to make my own adapters if I want to use these ports. I don't understand why AMS didn't just include pass-through cables for the many people who don't have a motherboard or sound card that have headers for the ports.
|
|
|
The Cooling system and Accessories:
|
|
This is a liquid cooled case, after all, and the cooling system is the reason that many people will look at this setup.
Cooltechnica offers a variety of options: Swiftech or Dangerden waterblocks, Eheim 1250 or 1048 pumps, 3/8" or 1/2" tubing (and silicone vs. Tygon), and accessories such as a pump relay kit and a customized Digidoc5. Here are the components as tested:
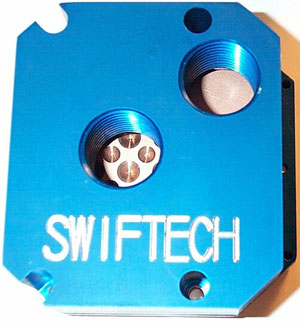
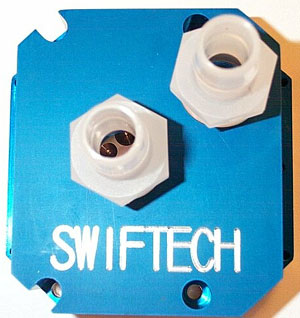
Swiftech MCW462-UH waterblock: the MCW462-UH is Swiftech's latest waterblock. It is compatible with AMD's Socket A, and Intel's Socket 478 and Socket 603. The block comes with all the necessary hardware for all installations. The block has a copper baseplate with an anodized aluminum top. The water flows into the block from a center inlet, and exits from one corner of the block (the exhaust should be at the highest point of the block when installed to make sure no air collects inside). The baseplate is identical to the popular MCW462-U waterblock, with drilled divots over the die area to increase turbulence and improve heat transfer. The top piece is much changed from the MCW462-U, however, with large ½" NPT threads taking the place of the 3/8" quick connect fittings.
|
|
 |
|
 |
|
|
|
Part of the performance of the Swiftech MCW462-U was the result of increasing water velocity at the die area with the smaller inlet (think of it as a nozzle
effect), but with weak pumps then this smaller inlet and outlet induced substantial pressure drop. It will be interesting to see whether the UH's higher flow rates will allow it to compensate for lower water velocity at
the inlet.
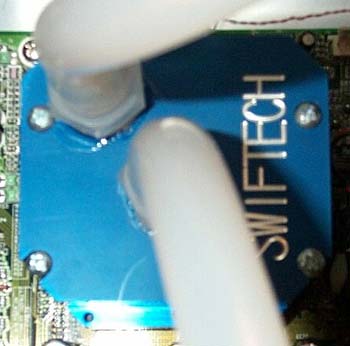
The Swiftech Socket A blocks mount using the 4 holes on the motherboard, but in a manner very different from many other manufacturers.
First, you install standoffs into the holes around the socket by bolting them in place with nylon nuts. If you are going to mount the block repeatedly, it is a good idea to add a dab of super glue to the nut to keep the standoff from coming loose. Then, once the standoffs are installed on the board, you then diagonally and gradually screw machine screw with springs and a spacer down into the standoff. The screws are chosen so that the proper AMD mounting pressure (~20 lbs force) is applied to the core. A close examination of the springs shows that they have been filed flat on the end to better ensure proper force every time.
|
|
 |
|
|
I found this mounting method to be much simpler and quicker than using nuts to tighten springs down (like for example my Dangerden Maze2 uses). I hope
more block makers use a similar method; it really works well.
|
|
|
|
|
|
|
|
|
More Cooling System stuff this way
 |
|
|
|
| Random Forum Pic |
 |
| From Thread: About to order heater core |
|
| | ProCooling Poll: |
| So why the hell not? |
|
I agree!
|
 67% 67%
|
|
What?
|
 17% 17%
|
|
Hell NO!
|
 0% 0%
|
|
Worst Poll Ever.
|
 17% 17%
|
Total Votes:18Please Login to Vote!
|
|