|
|
|
|
 Tips for replacing bad caps on your mobo Tips for replacing bad caps on your mobo
|
|
Date Posted: Mar 8 2006
|
|
Author: Joe
|
|
Index:
|
|
|
Posting Type: Article
|
|
Category: Electronics
|
|
Page: 1 of 1
|
Article Rank: from 1 Readers
Must Log In to Rank This Article from 1 Readers
Must Log In to Rank This Article
|
|
Forum Discussion Link
|
|
|
|
Tips for replacing bad caps on your mobo By: Joe
|
Tips for replacing bad capacitors on your motherboard
Well this is sort of an impromptu article, to cover what I see as some misconceptions that are on the web related to replacing leaking and dried out caps on your motherboard. I just finished this myself tonight with a radio shack soldering iron, some good solder, a finger nail clippers, and some Low ESR caps. I will go over all this below.
Here are the caps that were removed.
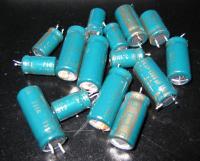
They are from that stolen formula batch and from the notorious GSC company. (well known for leaky caps). They came off my Epox 8RDA+ motherboard that was shown in my Silverstone case review. Ther are no before and after photos because I didn’t think I was going to be writing an article. Because this machine is my HTPC it's back in use and I would have to rip it out of my home theater again to take pics. Nothing exciting; they just look like caps that aren’t leaking 
There are other articles out there that I used as a basis for this replacement and I need to begin by giving them credit where credit is due:
I used the AOA article to get the part numbers. But that in itself is something I will address here because there are some common misconceptions when it comes to what you need to use. The AOA article explains a very solid way to do this, my way is a bit more half assed 
Getting Started
First off here is what I used:
- Radio shack adjustable pencil tip soldering iron set to 800F temp.
- Old nail clippers. (quite sad... my side cutters were no where to be found so I had to use these)
- Silver solder. (used for R/C soldering I do, its very high quality stuff)
- New capacitors from NIC.
What caps did I get and use?
Well like Gizmo at the AOAforums I got some engineering samples from NIC only they didn’t send me everything I wanted. I received: (for part numbers check the AOA article linked above)
- 6x 1500uF 6.3v Caps
- 6x 3300uF 6.3v Caps
- 6x 2200uF 10v Caps
This put me into a weird position because I wanted 6x 1000uF 6.3v also. This is where some preconceptions went out the window. The 3300uF caps on the motherboard were fine; they are Sanyo's and showed no signs of age. So I left them alone. This freed up the 3300uF caps for other uses.
Note: You dont need to use NIC or any specific brand. What you need to look out for is size and make sure you are getting equal or greater than the capacitance needed in the cap you are replacing. Panasonic make great Low ESR caps and you can buy them on Digikey. The Panasonic FM series are the ones people like for this kind of application.
For those that don't know, you can generally use a cap of greater capacitance in place of one of a lower rating. So what I am doing is putting the new 3300uF caps in the place of the short and fat 1500uF caps on the board (fit perfectly), and put the new 1500uF caps in place of the 1000uF caps on the board. The new 1500uF caps were the same size as the leaking 1000uF caps that were coming out. And the new 3300uF's were taller but the same diameter as the leaking 1500uF's that were coming out so it worked out well.
I am still short 3 caps (1000uF replacements) but all the main system power caps were replaced.
How to remove and replace the caps
Now some folks in the electronics field will cringe to read this... so take note that this is a half-assed, but fast and simple way to do this. I take no responsibility if you toast your rig. Just for validation... after this my board ran... and ran OC'd higher than ever
Step 1: Tin the tip of your soldering iron (which should be at 750 - 800F). Make sure that it's well tinned and ready to go to work.
Step 2: Get the board positioned so you can hold the cap with one hand and then reach the solder points on the back of the board with the soldering iron.
Step 3: With your hand holding the cap, put pressure so that its trying to pull one of the legs out of the board. While doing that melt the solder on the pin sticking out the back of the board. Do this back and forth to remove the pins from the holes. Once the cap is removed the hole will be filled with solder. This is ok, unlike some other write up's you dont need to clear that out with my method.
Step 4: Take your new cap, and trim it so the leads are 1/4 the original length and make sure to keep the + side longer. This makes it easier ot insert, and also helps you keep track of which is + and which is -.
Step 5: Now here’s the magic that makes it pretty fast: Just press the long prong onto the solder point and from the back heat up the pad... it should melt and let the cap just slide in on one side. Do the other side and rock it back and for heating each side as you rock it in that direction to get it all the way seated onto the PCB. If you see that you pushed all the solder out of the hole then apply some good solder to the pin and pull it back through the hole again and push it back out. This should get it well set.
Step 6: Take the nail clippers or side cutters and trim the newly soldered leads sticking out the back of the board back to the normal length.
Repeat for each cap. I did caps one at a time so I could remember the correct rating and location.
Now some cautions:
1. Don’t hold the soldering iron too long on the board or you could damage it.
2. Don’t scratch the protective layer on the PCB or you could end up soldering more than you want... causing some smoke when you fire it back up
3. Take a Xacto knife or a dental tool to remove any excess solder around the pin locations so there’s no chance you bridged over to another connection when you soldered the stuff back on.
Results:
The total time from removing the system from the home theater to getting it back in was 1 hour 45 minutes. In that time I replaced 16 capacitors, and got the board back in and fired up.
Before the cap upgrade, the board before was so unstable that it would not even finish a boot at 1900Mhz on a Athlon 2500+ Barton which runs stock at 1850Mhz. After this fix, the machine boots up and runs stable at 2100Mhz and the ram is running better as well (since I also replaced those caps).
Total cost assuming one buys the caps? - $15.00 and for that price I now have a nice Athlon based HTPC that has Nvidia Sound storm and runs really nicely.
Hope this helps and makes it a bit easier for those looking to do this!
Enjoy and happy soldering!
Joe
|
|
|
|
|
| Random Forum Pic |
 |
| From Thread: 12volt Water pump goodness |
|
| | ProCooling Poll: |
| So why the hell not? |
|
I agree!
|
 67% 67%
|
|
What?
|
 17% 17%
|
|
Hell NO!
|
 0% 0%
|
|
Worst Poll Ever.
|
 17% 17%
|
Total Votes:18Please Login to Vote!
|
|