|
|
|
|
 Making a Copper Waterblock Making a Copper Waterblock
|
|
Date Posted: Nov 26 2000
|
|
Author: OnDaEdg
|
|
|
|
|
Posting Type: Article
|
|
Category: H2O and Evap
|
|
Page: 1 of 1
|
|
Article Rank:No Rank Yet
Must Log In to Rank This Article
|
|
|
|
|
Note: This is a legacy article, imported from old code. Due to this some items on the page may not function as expected. Links, Colors, and some images may not be set correctly.
|
|
|
Making a Copper Waterblock By: OnDaEdg
|
|
Tackling the Copper Waterblock
|
|
|
|
In my previous article, we went ahead and got the radiator and fans mounted on the case. Now it's time to make the waterblock. Once again, I am going to repeat my five main goals of this new watercooling system:
- It must operate as reliably as an air cooled heatsink for extended period of time.
- It must be fully enclosed inside the case itself.
- There must be no leakage or condensation whatsoever.
- It must run quietly
- The ladies must dig it! (In other words, it must look good)
|
|
|
|
With these goals in mind, let's get started on the waterblock.
As most of you know, copper is the best material to make a waterblock out of in terms of performance/cost. Sure, silver has better thermal conductive qualities, but who can afford a block of silver? Clearly, copper is the best choice. Now that we know what type of metal we are going to use, let's list the tools and materials we are going to need for this endeavor.
|
|
|
|
|
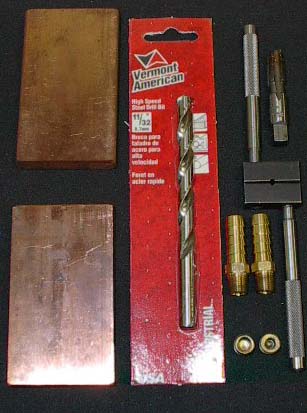
- Standing drill press
- Vice to hold block under drill press
- 11/32in high speed steel or titanium drill bit
- 1/8in NPT pipe thread tap and hand tap.
- (2) 1/8in pipe hose-barbed fittings for 3/8in hose
- (2) 1/8in pipe thread plugs
|
|
|
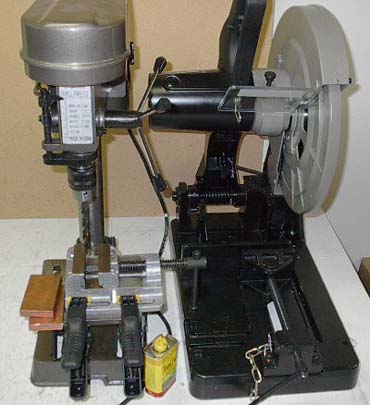
What project would be complete without power tools??
|
|
|
 |
|
|
|
The Gear You'll need
|
 |
|
|
|
|
Optional Stuff:
Tapping oil, small glass jar of kerosene
Really Optional:
Porter Cable 1410 14in. Dry Cut Saw. Heh. Now we're talking tools!
|
|
|
|
|
|
In order to make a copper waterblock, you MUST have the six tools in the numbered list. There is no way you are going to make a good waterblock without them. If you do not have all the necessary tools at your disposal, do not waste your time trying to make one.
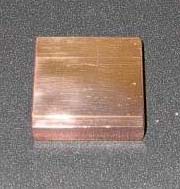
Now that we have all the tools assembled, let's get started. First thing we have to do is decide on the size of the waterblock. I chose to use a 2in(width) x 2in(length) x .5in(thick) design for my system. Sure, I could have gone bigger. But with the design I am going to use, a bigger block probably wouldn't lower my temperatures at all. I also have to consider weight. Copper is a very heavy metal. If the copper waterblock is too big and heavy, you will have some mounting troubles.
With the dimensions of the block decided on, let's get us some copper. I purchase mine from a local supply company. I am very fortunate because most of you will not be able to drive somewhere relatively close and buy copper bars. I hear onlinemetals.com are pretty good at supplying copper . If anyone knows of another place, email me and I will add it to the article. When you are buying the copper, do yourself a favor and order it with the width equal to 2in. If they will cut it to size, have them do it! If they won't cut it to size, buy a piece that is 2in wide and approximately 5in long. Take the bar to a local machine shop and tell them that you would like two 2x2in pieces out of that bar. It should take them a whole three minutes to cut that bar up for you. It will probably only cost you a couple of bucks. Your best bet would be to go to a small shop who works with people on a personal level rather than a large contract-oriented shop. I myself bought a 3ft(long) x 2in(width) x .5in(thick) bar. Yes, I know that wouldn't fit into my case. Hehe. Being the owner of a metal cutting dry cut saw, I can cut the length of the bar to anything I desire.
|
|
|
|
You all got nice Dry cut saws at home right??
|
|
 |
|
|
|
|
Future Super Cooling Device
|
|
 |
|
|
|
|
I like to experiment on different designs and I will have plenty left over to experiment with that's for sure. We got the tools We got the copper. Let's get started.
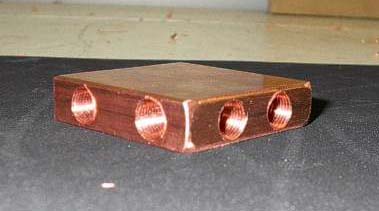
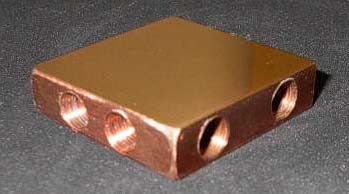
Before we begin drilling the block, we have to decide on the design. I chose a design that looks like an empty tic-tac-toe board. It is called a cross-channel design. Two parallel channels will be drilled from the flattest side of the block down 1.5in (this will be the top).. Another two channels will be drilled coming in from one of the sides perpendicular to the top. These channels will also be drilled 1.5in. As you can tell, there will be a total of four channels drilled. Also note that we are drilling on only two sides of the block. Using the length gauge that comes mounted on my drill press, I set it to 1.5in so that the drill bit can not travel any further than 1.5 inches. Now I have to decide on the exact spots on the blocks where I will drill the channels. Without going into too great of detail, I will tell you that I chose to begin drilling the top two channels 1/2in. from the ends of the block. Taking a ruler, I place a centered mark at 1/2in from the ends of the top. Now I place a centered mark 5/8in from the ends of the side of the block. I know this is jumping ahead a bit, but I am going to display a picture of a block I have already finished so you can get a clear idea of what the channels will look like when completed.
|
|
|
|
Look'n more like a Super Cooling Device Eh?
|
|
 |
|
|
|
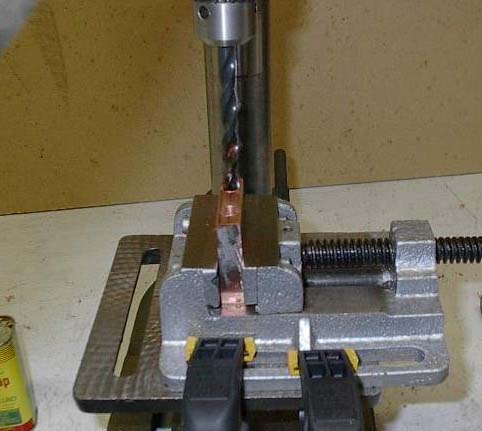
Now it's time to go ahead and drill the channels in the waterblock. Believe it or not, this is the hardest part of the whole process. Anyone who has drilled copper knows that as it gets hot, it begins to get softer and even "gummy". Once it gets gummy, the metal that the drill bit is cutting sticks to the bit and can lock up your drill press. So we have to take proper precautions to try and prevent this as much as possible. Most machinists will choose to not use any kind of lubricants. They just use a very powerful drill press with a good sharp bit and drill the copper fast enough so that it doesn't have time to get warm and lock up the press. Since most of us don't have a several thousand dollar drill press needed to do this, we have to try other tricks. The first trick I have learned to use is to throw the copper blocks in your freezer several hours before you are to begin drilling. This will give you a few extra minutes before the copper gets hot and gums up. Secondly, you can use cutting oil. Once it begins to get hot, poor a dab of cutting oil on the bit. It will allow the gummed up copper to slide up the drill bit easier and out of the channel. The technique I use is to freeze the block first, then quickly get the block set up in the drill press and begin drilling swiftly. At a low drilling rpm, I begin drilling trying to get as far down into the material in the shortest amount of time while still doing it safely. Once it heats up, I stop the press and pour a bit of the oil onto the bit and begin drilling again. This can be a very time consuming process. If you are not in a rush to finish your waterblock, you can, after each channel is drilled throw it back into the freezer for a bit. Then begin drilling again. Remember to set your drill press so that it can not drill further than 1.5in through the block. Also remember to line up your drill bit on the exact spot where you placed your mark on the block. This will ensure that you do not drill too close to one side which can cause problems. Make sure your marks are centered and that the drill press vise is tightly held down and sturdy. Using the techniques I outlined above as well as double checking all your measurements and setup should allow you to make 4 good, centered channels. Try and be as careful as possible to make sure everything is correct before you start drilling the block. Once you start drilling, there is no turning back. Yes I am being kind of anal-retentive about the final procedures before you start drilling. You will see why if you happen to make a mistake because you weren't careful. Let's take a look at the block during drilling as well as after the fourth channel is done:
|
|
|
|
|
|
 |
|
|
 |
|
|
|
|
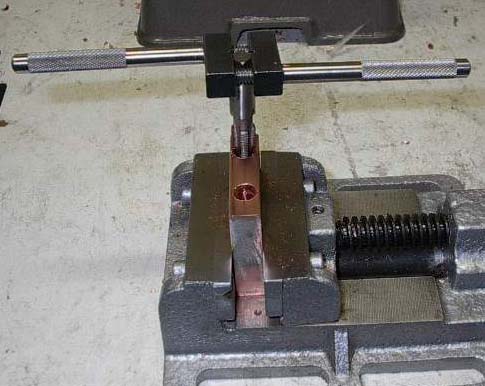
Looks like the channels were drilled successfully. Now it's time to tap the channels so that they can accept the proper fittings. First, I place the block into the vice so that it can not move. Then I take the tap and slowly place it into the first channel turning it gently. The most difficult process here is getting the tap started in a perfectly upright position. We do not want to tap the block at an angle. I tap it with my right eye directly above everything so that I can watch the tap remain vertical. Once we have the tap started and it has begun to cut itself down into the channel, we can concentrate on just turning the tap. This process can require a lot of force so do not be afraid to really put some muscle into it. I recommend coating the tap with either the kerosene or the cutting oil.. This will allow you to tap the channels a bit easier and cleaner. Let's take a look at the tapping in process:
|
|
|
|
 |
|
|
|
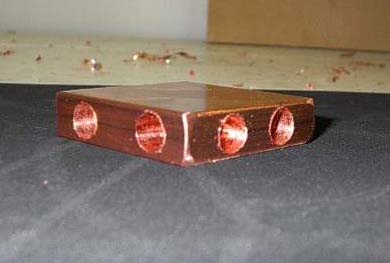
Once all the channels are tapped using the 1/8in pipe tap, we should have a drilled and tapped block that looks like this:
|
|
|
|
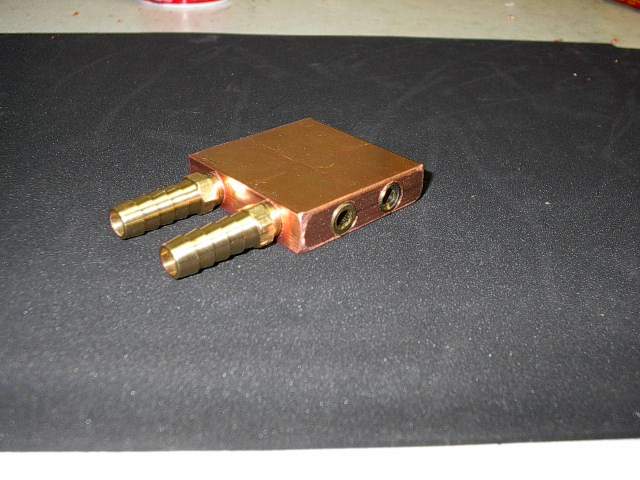
Hopefully you can see the threads in the above picture. Because without them, we wouldn't have a block that looks like this:
|
|
It appears that the waterblock, like the radiator, is a big success. The channels are perfectly aligned. The threads were tapped straight. And the barb and plugs fit perfectly. I now have two of the most difficult steps to creating a new watercooling system completed. It's time to completely debur, lap, and polish the waterblock. But I'll save that for the next article. Time to go eat some leftover turkey! Until then, OnDaEdg is out!
|
|
|
|
| Random Forum Pic |
 |
| From Thread: Post your watercooled pictures |
|
| | ProCooling Poll: |
| So why the hell not? |
|
I agree!
|
 67% 67%
|
|
What?
|
 17% 17%
|
|
Hell NO!
|
 0% 0%
|
|
Worst Poll Ever.
|
 17% 17%
|
Total Votes:18Please Login to Vote!
|
|