|
|
|
|
 OnDa's Ultimate Video Cooler OnDa's Ultimate Video Cooler
|
|
Date Posted: Jan 25 2001
|
|
Author: OnDaEdg
|
|
|
|
|
Posting Type: Article
|
|
Category: High End Cooling
|
|
Page: 1 of 2
|
|
Article Rank:No Rank Yet
Must Log In to Rank This Article
|
|
|
|
|
Note: This is a legacy article, imported from old code. Due to this some items on the page may not function as expected. Links, Colors, and some images may not be set correctly.
|
|
|
OnDa's Ultimate Video Cooler By: OnDaEdg
|
|
|
How to Supa Cool your Video card, an OnDaEdg Exclusive!
|
|
|
|
As most of you already know, I am currently working on a new water cooling project. Thus far, I have made the copper waterblock, and mounted the radiator, .
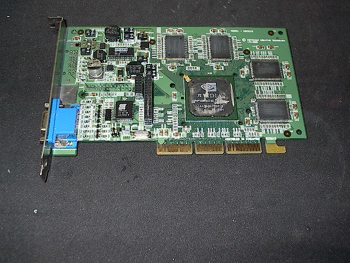
Now it's time to do some extreme cooling to the video card. At first thought, this would seem to be a bit overkill to most people. But, isn't that what overclocking is all about anyway? It's time to turn this 32 meg GTS into a super GTS. First, I had to come up with a plan. As everyone knows, the lack of bandwidth is what kills the performance of the GTS. A lot of people have been using to some degree of success small heatsinks attached to the memory chips hoping to get another 10-15 mhz of speed out of them. I decided I wasn't interested in making my 400 mhz capable ram chips 415 mhz ram chips. That is not what I call an overclock. Well, if I'm not going to throw a heatsink on there, how am I going to get some extreme cooling to those ram chips? After about an hour of throwing ideas around, I decided on the most extreme overclock I could come up with for a videocard. I am going to cool the GPU and the ram chips with five 56 watt peltiers. Wow, that's a lot of pelts you might say. So how am I going to cool the pelts? That's easy. I will use five aluminum waterblocks to cool those to near room temperature. At 12 volts, using a basic peltier formula, each ram chip should be cooled to approximately -30 degrees F.
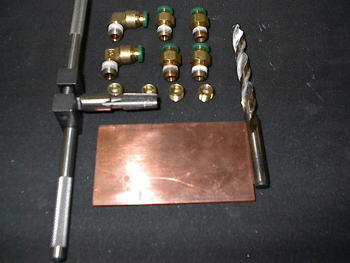
Now that I have set my goals to this project, it's time to gather the materials. I am going to need the following items:
(1) Drill press. Aluminum bar 2in wide by .5in thick. (5) 56 watt peltiers. 1/8in thick copper plate. (4) prestlok 1/8in pipe fittings. (4) elbow prestlok 1/8in pipe fittings. 10ft of parflex tubing. Conformal coating. 1/8in pipe tap. #40 tap and drill bit. Masking tape. 11/32in drill bit. (4) 1/8in pipe thread plugs. Arctic Silver Thermal Adhesive.
|
|
|
|
|
|
 |
|
 |
|
|
|
|
|
Now that we have the materials needed. Let's get started. The first thing I have to do is take the old heatsink off the GTS. This isn't too difficult. I just used a butterknife to pry it off. You have to be careful though not to damage the GPU. I have heard of people pulling the GPU right off the pcb board.
|
|
|
|
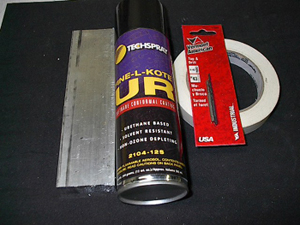
Now that the heatsink is off, I take a razor blade and scrape the residual adhesive that is left off of it. Since there is obviously going to be condensation issues that have to be addressed, several coats of conformal coating is absolutely necessary for the video card. First, I cover the ram chips ,GPU, and the agp slot connectors with some masking tape. I then apply five good coats of conformal coating to both sides of the card. This is extremely important and a step I would not skip.
|
|
 |
|
|
|
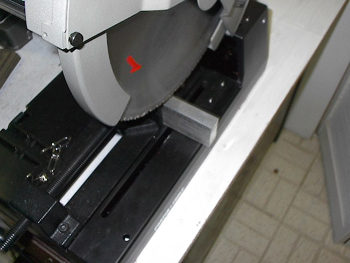
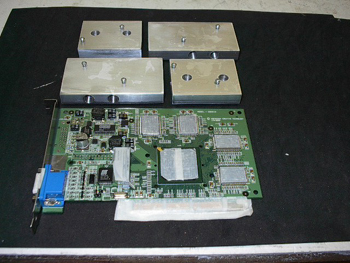
Now for the copper cold plates and the aluminum water blocks. Since there are 4 chips on each side of the board, I chose to use two copper cold plates per side. This way, one plate will cover two ram chips. I measured the distance between each pair of ram chips and found it to be 47mm. I chose to make the copper cold plates 47mm long by 30mm wide. Taking my copper plate, I measured out and drew in four 47x30 pieces. I then placed the copper into my Porter Cable 14in Dry Saw and cut out four copper cold plates. Now it's time to cut the aluminum for the water blocks. After measuring out the card, I decided to make two waterblocks 64mm by 43mm. I chose to make the other two blocks 90mm by 50mm. These sizes allowed the blocks to cover the entire surface of the card while not protruding outside it. Once again, I measure out the pieces I need and using my dry cut saw, I cut out four aluminum blocks out of the aluminum bar. Now that the blocks and cold plates are cut, it's time to drill the channels into the water blocks. Due to the fact that I am dealing with low levels of heat, I do not need to make a very complex waterblock to cool the pelt and ram chips. I came to the conclusion that a single 1/8in pipe channel through the length of the blocks was more than sufficient. Using my drill press, I centered the 11/32in bit and drilled length ways through the center of all four blocks. I do not drill all the way through to the other side though. I only want to have to plug one end of each block and not two. Now that all four blocks have a channel drilled through them, I have to drill two more channels into each block to accept a pair of prestlok fittings. The 90x50 blocks will have the openings coming in from the tops of the blocks while I decided to place the openings on the 47x30 blocks coming in from an overhead direction. The picture will give you a much better idea of what I mean.
|
|
 |
|
|
|
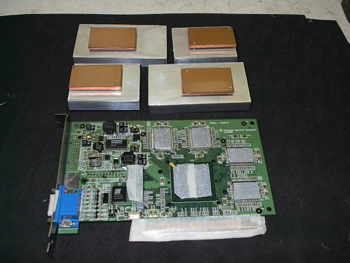
You may notice the two screws in each block. This is how I chose to tackle the mounting issue. Now, take a look at this next picture and you may start to realize how I am mounting this to the card.
|
|
 |
|
|
|
As you can see, I have drilled two corresponding holes inbetween each waterblock and cold plate. I then tapped the copper plates to accept a #40 screw. The trick is to make sure that as you're tightening the block to the plate, that the screw does not go beyond the cold plate and push the cold plate off of the ram chip. This is where a little luck came in. Using a .5in screw and a tiny washer, I had a perfect fit when the peltier was placed inbetween the block and cold plate. The screw held them together firmly while not extending beyond the cold plate. Now, how do I attach the cold plate to the ram chips? Easy. Arctic Silver Thermal Adhesive is the answer. The adhesive is very strong and I tested it before hand to make sure it could hold up the weight of the block, pelt, and cold plate. It performed wonderfully. I highly recommend it for any videocard cooling project. Using the adhesive, I attach the copper cold plates to each ram chip. Here is a picture of the assembly without the peltiers in place.
|
|
 |
|
|
|
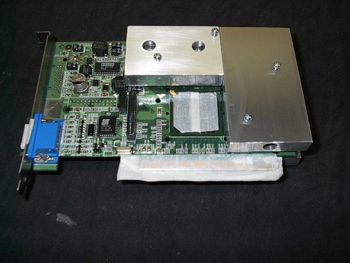
Thus far, the video card project is a huge success. The blocks and cold plates are in place. Now I have to make a block for the GPU unit. After doing a small bit of measuring, I concluded that a single channel block of dimensions 50mm x50mm would do the trick. I cut out the right sized piece using my dry cut saw and drilled a single channel in it.
|
|
|
|
| Random Forum Pic |
 |
| From Thread: 0221 casemodding, first steps (56K, beware) |
|
| | ProCooling Poll: |
| So why the hell not? |
|
I agree!
|
 67% 67%
|
|
What?
|
 17% 17%
|
|
Hell NO!
|
 0% 0%
|
|
Worst Poll Ever.
|
 17% 17%
|
Total Votes:18Please Login to Vote!
|
|